
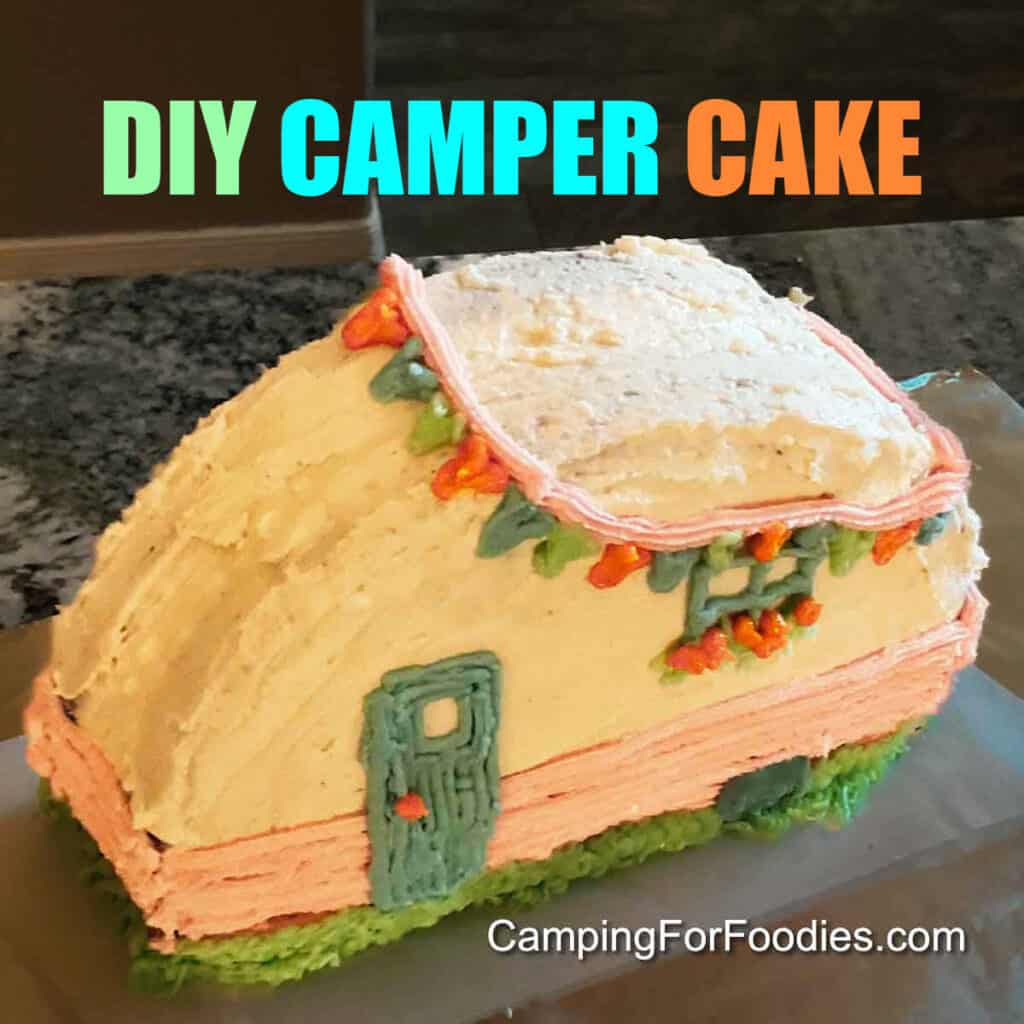
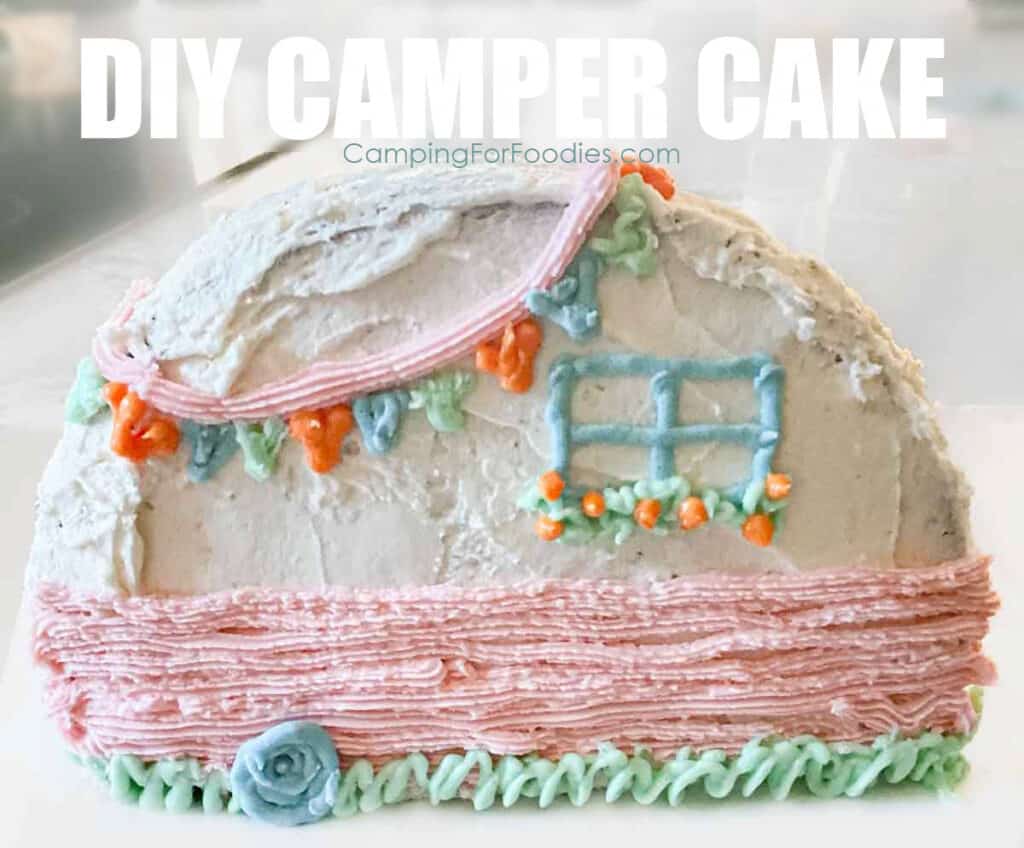
Overlook these completely satisfied camper cake toppers, make an superior 3D camper cake as a substitute! Individuals don’t must be skilled cake decorators to make an lovable retro trailer camp theme cake.
Making a do-it-yourself cake is so considerate. It’s certainly one of my absolute favourite DIY Tenting Presents to make and provides. Most likely as a result of my sister liked it a lot once I stunned her with one for her retirement! Additionally, you don’t have to fret about putting customized orders or supply instances such as you do when buying from a bakery.
Psst we’re compensated…see our disclosures.
DIY Camper Cake VIDEO
Be sure you hit the “STAY” button when it pops up within the backside proper nook of the display screen to look at the video to the top.
If you wish to re-watch the video, refresh the web page.
How To Make A Camper Cake
This 3D cake’s design is so easy, anybody with newbie cake adorning expertise could make this enjoyable tenting themed cake. We’re going to point out you the best way to make one completely satisfied camper cake with out utilizing fondant, wooden cake toppers or costly gear.
Step 1. Make the truffles. Bake or buy two 8-inch spherical truffles. Allow them to utterly cool earlier than adorning them. If the truffles are puffed-up within the middle, use a serrated knife to trim them in order that they sit flat in opposition to one another when they’re stacked.
Step 2. Make the frosting. You’ll be creaming butter then including powdered sugar, vanilla extract and milk to make the buttercream frosting thick sufficient to pipe by a pastry bag.
Step 3. Shade the frosting. The physique of the camper will likely be white. You’ll be selecting the colour scheme for the trailer. My design requires meals coloring to make pink, inexperienced, blue and orange coloured frosting.
Step 4. Enhance the cake.
I would like “5 Secrets and techniques To Profitable Tenting Journeys” plus weekly tenting suggestions & recipes.
Piping Luggage vs Ready Icing Pouches
Adorning Steps
Steps 1-4

#1 Place the primary cake, backside aspect down, on a bit of parchment paper within the middle of a big slicing board or sturdy serving tray. Frost the edges with a skinny crumb coat layer of white frosting. Frost the highest of the cake with a beneficiant layer of white frosting that may grow to be the center layer of the cake.
- Crumb Coat Goal: To frost the cake with a skinny layer of icing to forestall the cake from drying out and to “glue down” the crumbs to cease them from spreading into the ultimate frosting layer.
#2 Place second cake on prime of the primary one, backside aspect up.
#3 Crumb coat frost the edges and prime with a skinny crumb layer of white frosting.
#4 Slice about 1/4 of the layered cake off one aspect.
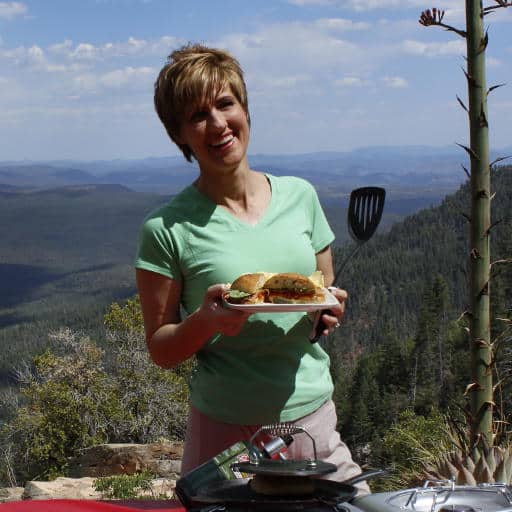
Steps 5-8
#5 Discard the piece of cake you chop (properly, you’ll truly eat it as leftovers for the baker LOL). This may create the flat backside of the trailer whenever you erect it to face upright.
#6 Fastidiously tip the cake upright so it’s standing on its flat aspect.
#7 The cake ought to be capable of stand by itself. If it will probably’t, chances are you’ll have to do further trimming to make it sturdy sufficient to face.
#8 Add a skinny crumb layer of frosting to the final aspect of the cake (previously the underside) that’s now uncovered and can grow to be one aspect of the camper.
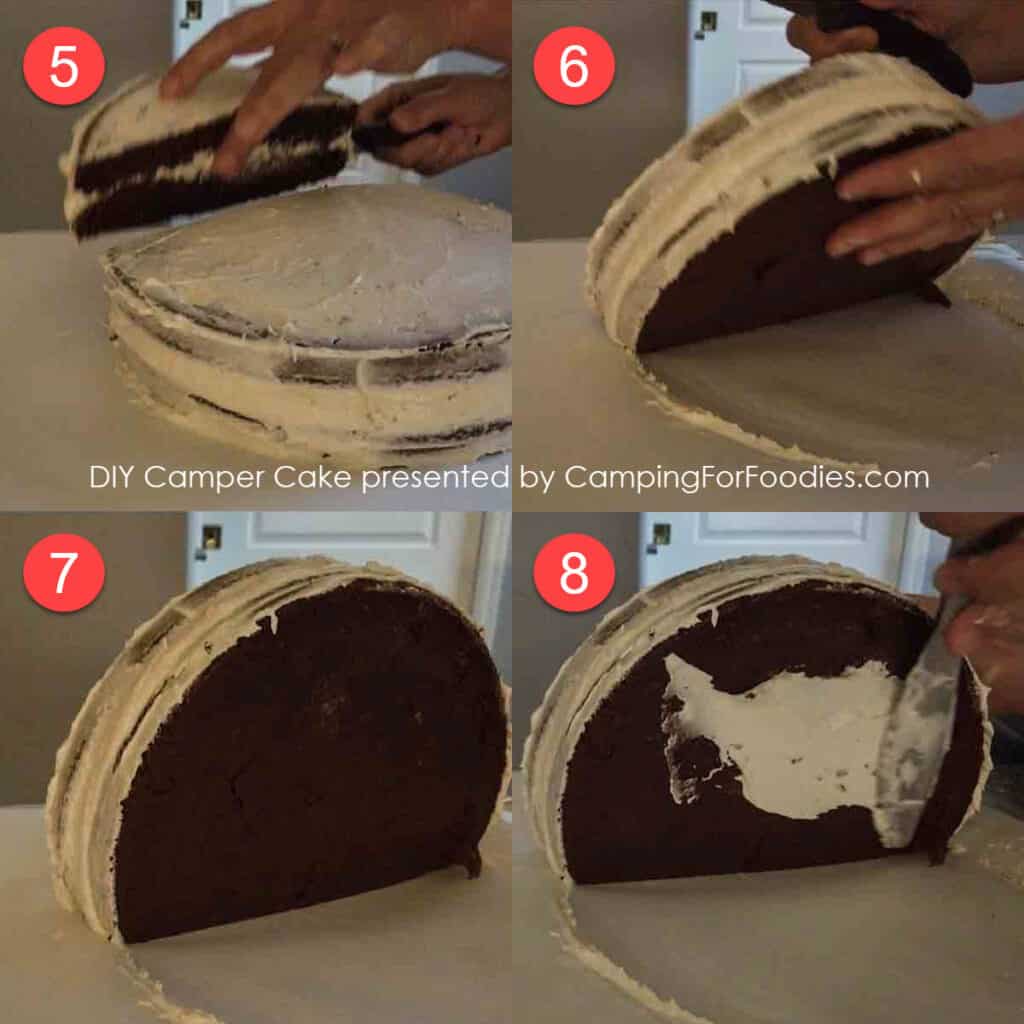
Steps 9-12
#9 Now, frost all the cake with white frosting to cowl the crumb coat.
#10 Utilizing an extended sharp knife, gently push the knife into the frosting to kind a line across the backside (about 1/4 up) of all the camper. This may outline a straight line that separates the highest and backside of the trailer for the completely different coloured frosting used to embellish it.
#11 Utilizing the trailer physique coloration (pink) frosting, pipe straight strains throughout the camper beginning on the outlined knife line.
#12 Work your method right down to the underside of the camper with the trailer physique coloration on all 4 sides of the cake.
Steps 13-16
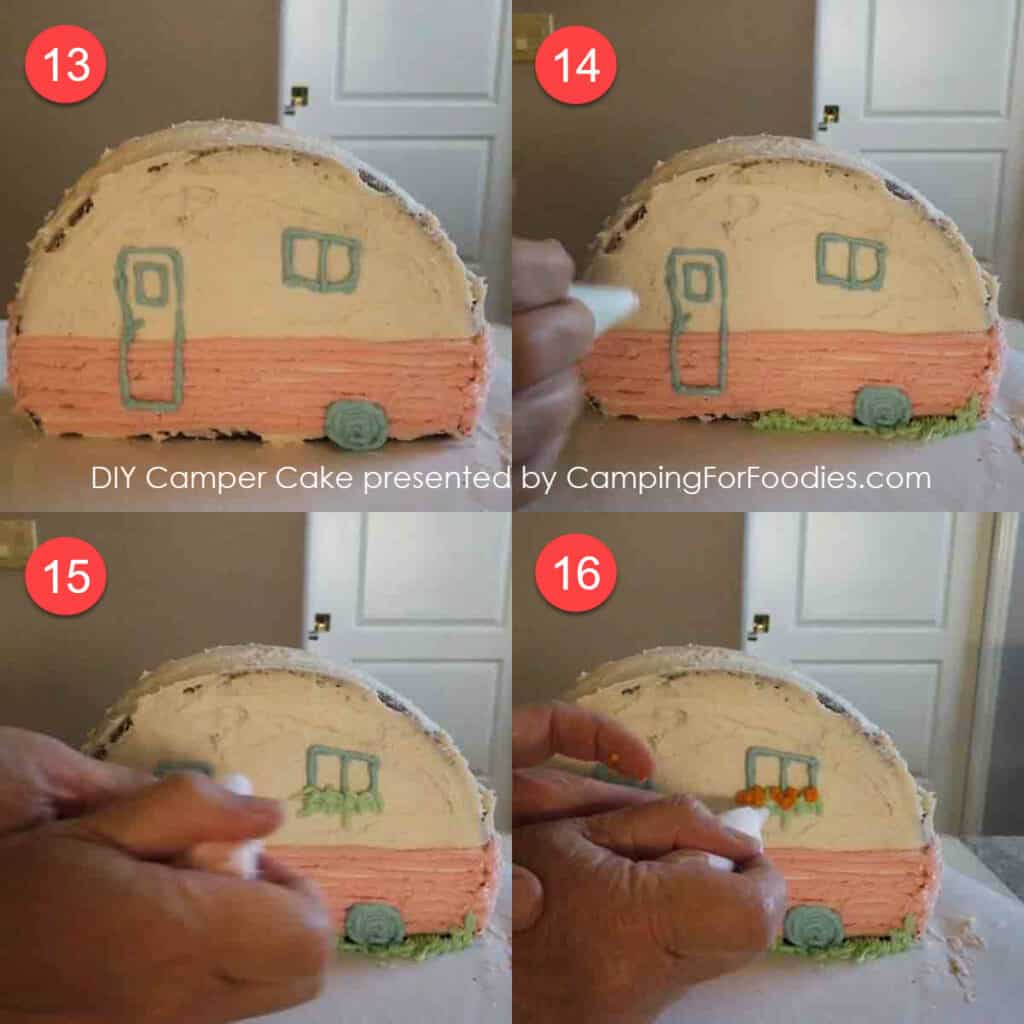
#13 Utilizing the door coloration (blue) frosting, pipe circles to make the tire and description the door and home windows.
#14 Utilizing the grass (inexperienced) frosting, pipe the grass.
#15 Utilizing the grass (inexperienced) frosting, pipe the leaves on the backside of the home windows to create the flower packing containers.
#16 Utilizing the flower (orange) frosting, pipe small dots within the leaves to create the flowers within the flower packing containers.
Steps 17-20
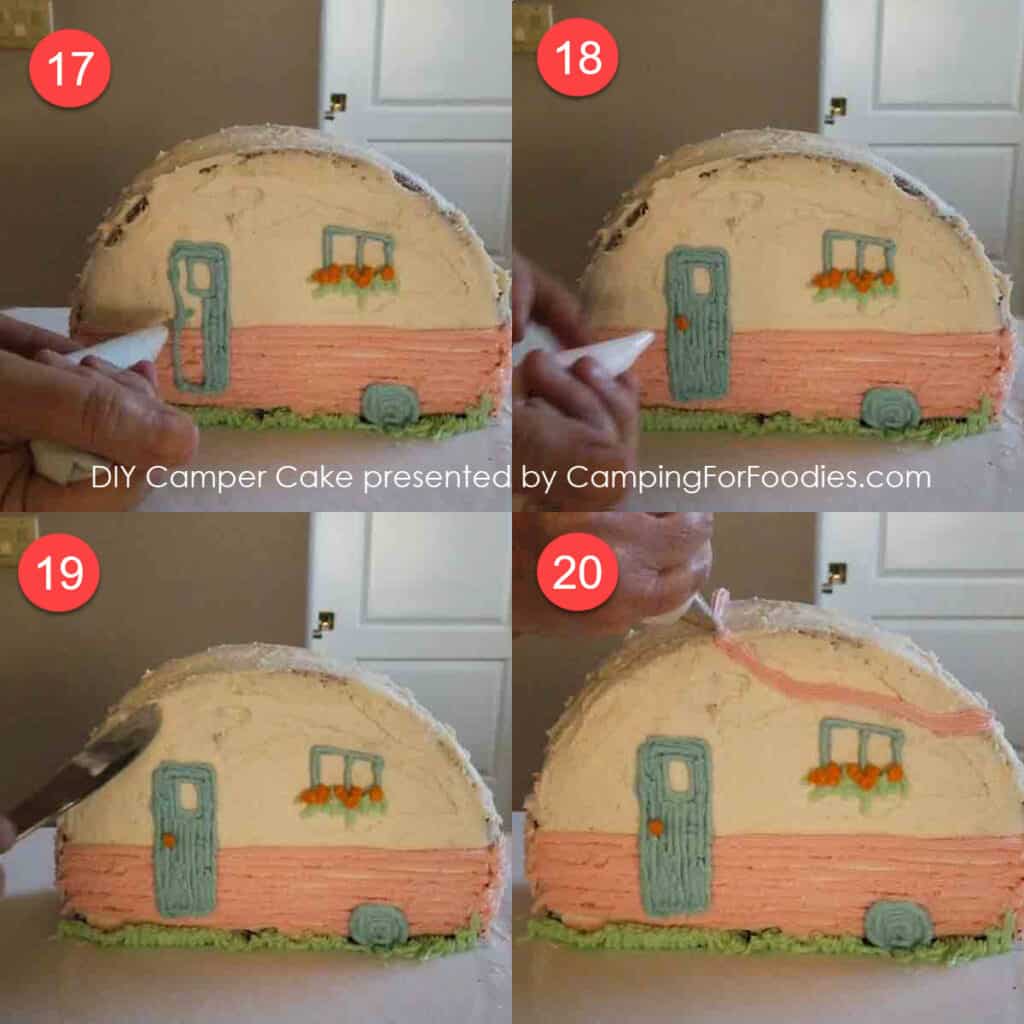
#17 Utilizing the door coloration (blue) frosting, pipe strains to fill within the door, leaving the window space open and white frosting uncovered.
#18 Utilizing the flower (orange) frosting, pipe a small dot to create the doorknob.
#19 Use a knife to unfold white frosting over any areas (particularly the sides on prime of the trailer) which have the cake displaying by the frosting.
#20 Utilizing the trailer physique coloration (pink) frosting, pipe a circle across the prime of the camper to create the string for the flags.
Steps 21-24
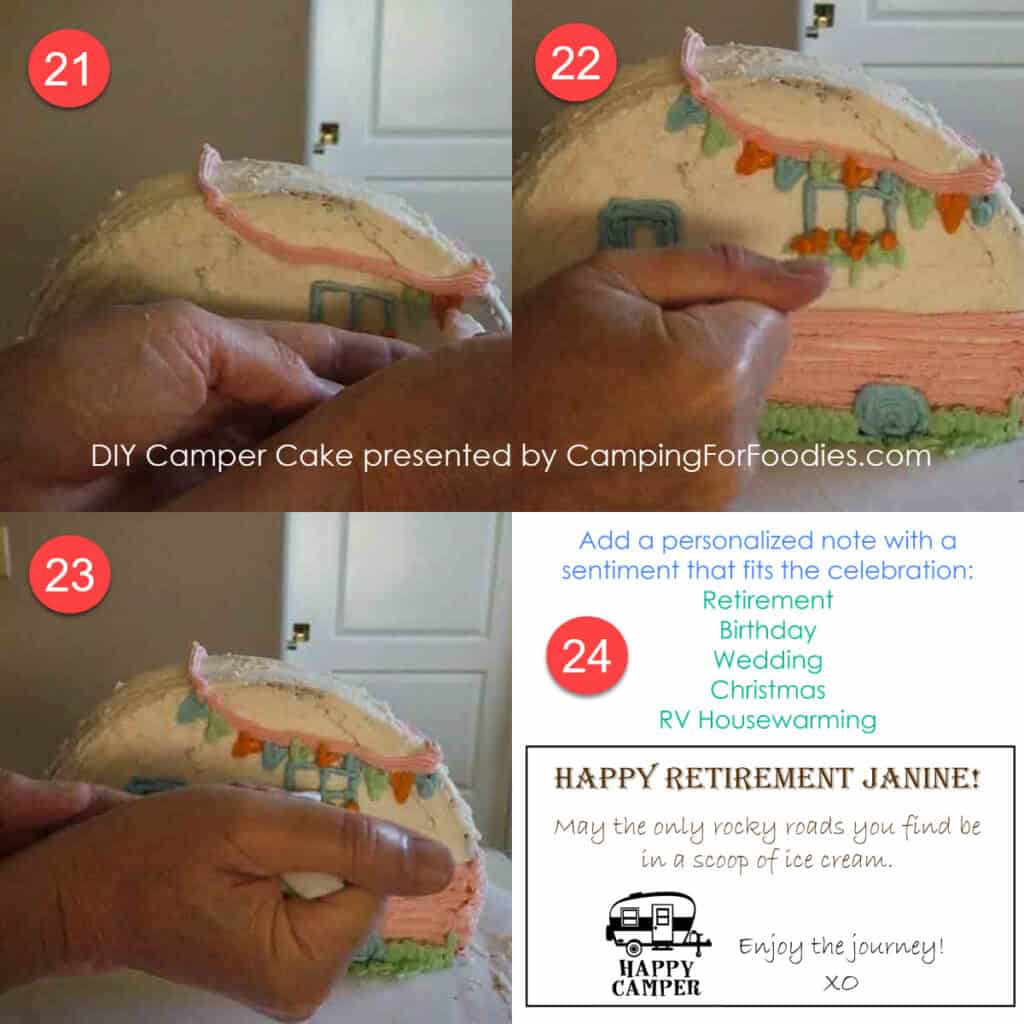
#21 Utilizing the inexperienced, blue and orange frosting, create triangle formed flags to hold from the string across the total camper.
#22 Pipe extra inexperienced frosting to fill within the grass.
#23 Pipe a blue horizontal line throughout the center of the home windows to create the horizontal body.
#24 Add sentiments to the cake. Muffins can be utilized to have a good time all kinds of particular events like:
- Retirements
- Birthdays
- RV housewarmings
- Christmas
- Weddings
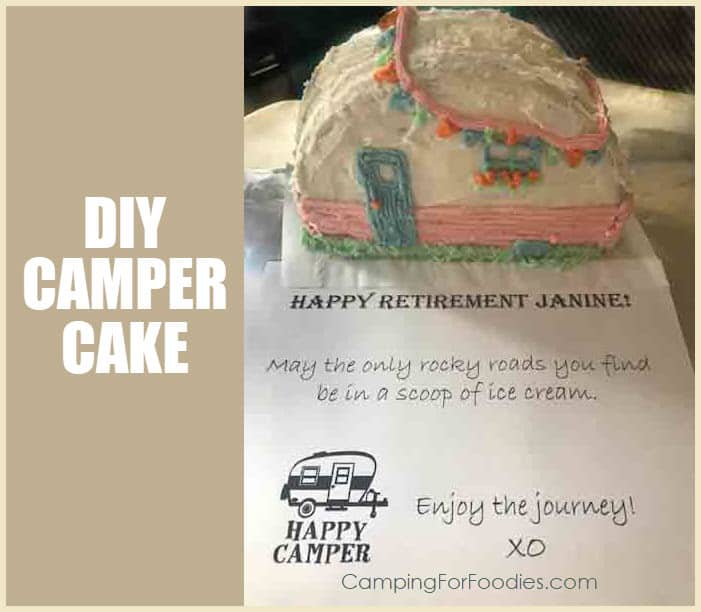
The cake you see in my video is a retirement cake I made for my sister who will likely be doing numerous RV touring throughout the USA together with her husband. I included my sentiment on a bit of paper that I displayed on the serving tray subsequent to the cake. It learn:
HAPPY RETIREMENT JANINE!
Might the one rocky roads you discover be in a scoop of ice cream.
Completely satisfied Camper (with a bit of retro trailer graphic)
Benefit from the journey! XO
Storage
I prefer to ship my embellished truffles immediately. If I can’t try this, I hold the cake lined with plastic wrap and retailer it within the fridge till I’m able to ship it.
Cake Recipes We Make At The Campsite
That is certainly one of my make forward tenting meals I absolutely put together at dwelling in my kitchen.
- We now have tons of tenting desserts we make proper on the campsite. Listed below are just a few of these truffles:
Our Dutch Oven Apple Dump Cake is the best cake ever. It’s actually not connoisseur however it’s going to fulfill your candy tooth!
This Dutch Oven Pineapple Upside Down Cake is at all times being requested by our members of the family on camp journeys!
These straightforward mini Dutch Oven Chocolate Lava Muffins are particular person servings that style so good, you’ll assume you’re consuming in a 5-star restaurant!
Each morning I make this Dutch Oven Espresso Cake I do know I’m going to see smiling faces trying again at me.
My from-scratch Dutch Oven Carrot Cake is a bit of further effort however sooooo price it! This moist cake is topped with a yummy cream cheese frosting. And, I’ve made it straightforward sufficient to arrange, bake and serve proper at your campsite!
Print This Recipe

DIY Camper Cake
Tenting For Foodies Dessert Tenting Recipes: This DIY Camper Cake makes enjoyable presents for particular tenting events.
Cake Components
- 1 (15 oz) boxed cake combine ready based on bundle instructions to make two 8-inch spherical truffles (normally requires the addition of water, eggs and vegetable oil)
Frosting Components
- 1/2 cup unsalted butter at room temperature
- 4 cups confectioners’ sugar
- 1 1/2 teaspoons pure vanilla extract
- 2 tablespoons milk plus extra if obligatory for thinning
- 4 completely different colours of meals coloring
Stop your display screen from going darkish
Make The Muffins
-
Bake two 8-inch spherical truffles based on bundle instructions. (When you’ve got a favourite recipe, you should utilize it moderately than a boxed cake so long as it goes properly with buttercream frosting.)
-
Take away from oven and utterly cool on wire racks.
Make The Frosting
-
In giant bowl, cream butter with electrical mixer.
-
Steadily beat the confectioners’ sugar into the butter till it’s absolutely included. (This will likely be comparatively thick frosting but it surely must be skinny sufficient to pipe by a pastry bag. So, after the primary 3 cups of sugar, go gradual, chances are you’ll not want all the 4th cup).
-
Beat in vanilla extract.
-
Add milk and beat for few extra minutes. (If frosting turns into too thick, add extra milk, a bit of at a time, to achieve your required consistency.)
Shade The Frosting
-
Separate the frosting for the completely different colours you select on your camper’s décor.Bowl 1: Spoon 1/2 of the frosting into the primary bowl, it’s going to stay white.
-
The remaining frosting will likely be divided into the remainder of the bowls to be coloured with meals coloring.Bowl 2: Spoon 1/2 of the remaining frosting into the second bowl that will likely be used to paint the physique of the camper and string for the flags (I used a light-weight pink). Combine frosting with meals coloring and spoon into piping bag (use star tip, if desired).
-
The remaining frosting will likely be equally divided into the ultimate three bowls to make the bottom, door, home windows, flowers, leaves, door knob and flags.Bowl 3: Spoon 1/3 of the remaining frosting into bowl three to paint the grass, leaves in flower packing containers and a number of the flags (I used a light-weight inexperienced). Combine frosting with meals coloring and spoon into piping bag (use spherical tip, if desired).Bowl 4: Spoon 1/3 of the remaining frosting into bowl 4 to paint the door, home windows, tire and a number of the flags (I used a light-weight blue). Combine frosting with meals coloring and spoon into piping bag (use spherical tip, if desired).Bowl 5: Spoon 1/3 of the remaining frosting into bowl 5 to paint the doorknob, flowers within the flower packing containers and a number of the flags (I used a light-weight orange). Combine frosting with meals coloring and spoon into piping bag (use leaf tip, if desired).
Enhance The Cake
-
It’s useful to have a camper drawing or object you may check with as you adorn. I used my completed Retro Camper Rock Portray Tenting Exercise as my inspiration for this cake design.
-
If the truffles are puffed-up within the middle, use a serrated knife to trim them off in order that they sit flat in opposition to one another when they’re stacked.
-
Place the primary cake, backside aspect down, on a bit of parchment paper within the middle of a big slicing board or sturdy serving tray.
-
Frost the edges with a skinny crumb coat layer of white frosting. (see * Observe)
-
Frost the highest of the cake with a beneficiant layer of white frosting that may grow to be the center layer of the cake.
-
Place the second cake, the other way up, on prime of the primary cake. You need the underside of the second cake dealing with upwards to provide the flattest floor for frosting.
-
Crumb coat frost the edges and prime with a skinny crumb layer of white frosting.
-
Slice off about 1/4 of the layered cake from one aspect and discard (properly, you will truly eat it as leftovers for the baker LOL). This may create the flat backside of the trailer whenever you erect it to face upright.
-
Fastidiously tip the cake upright so it’s standing on its flat aspect.
-
Add a skinny crumb layer of frosting to the final aspect of the cake (previously the underside) that’s now uncovered and can grow to be one aspect of the camper.
-
Now, frost all the cake with white frosting to cowl the crumb coat.
-
Utilizing an extended sharp knife, gently push the knife into the frosting to kind a line across the backside (about 1/4 up) of all the camper. This may outline a straight line that separates the highest and backside of the trailer for the completely different coloured frosting used to embellish it.
-
Utilizing the trailer physique coloration (pink) frosting, pipe straight strains throughout the camper beginning on the outlined knife line and dealing your method right down to the underside of the camper.
-
Utilizing the door coloration (blue) frosting, pipe circles to make the tire and description the door and home windows.
-
Utilizing the grass (inexperienced) frosting, pipe the grass and leaves on the backside of the home windows to create the flower packing containers.
-
Utilizing the flower (orange) frosting, pipe small dots within the leaves to create the flowers within the flower packing containers.
-
Utilizing the door coloration (blue) frosting, pipe strains to fill within the door, leaving the window space open and white frosting uncovered.
-
Utilizing the flower (orange) frosting, pipe a small dot to create the doorknob.
-
Use a knife to unfold white frosting over any areas (particularly the sides on prime of the trailer) which have the cake displaying by the frosting.
-
Utilizing the trailer physique coloration (pink) frosting, pipe a circle across the prime of the camper to create the string for the flags.
-
Utilizing the inexperienced, blue and orange frosting, create triangle formed flags to hold from the string across the total camper.
-
Pipe extra inexperienced frosting to fill within the grass.
-
Pipe a blue horizontal line throughout the center of the home windows to create the horizontal body.
Add Sentiments To The Cake
- Retirement cake
- Glamping birthday cake
- RV housewarming cake
- Christmas cake
- Wedding ceremony cake
The cake you see in my video is a retirement cake I made for my sister who will likely be doing numerous RV touring throughout the USA together with her husband. I included my sentiment on a bit of paper that I displayed on the serving tray subsequent to the cake. It learn: HAPPY RETIREMENT JANINE! Might the one rocky roads you discover be in a scoop of ice cream. Completely satisfied Camper (with a bit of retro trailer graphic) Benefit from the journey! XO
Serving: 1gEnergy: 272kcalCarbohydrates: 48gProtein: 0.2gFats: 9gSaturated Fats: 6gPolyunsaturated Fats: 0.4gMonounsaturated Fats: 2gTrans Fats: 0.4gLdl cholesterol: 25mgSodium: 4mgPotassium: 9mgFiber: 0.002gSugar: 47gVitamin A: 288IUCalcium: 7mgIron: 0.04mg
Make Each Camp Meal A Scrumptious One
There is no such thing as a purpose you may’t eat implausible meals out within the wild. Strive one thing new in your subsequent journey.