
You’ve most likely struggled to determine find out how to arrange Lightroom presets since April 2018. We don’t blame you. Since Adobe modified all presets from the .lrpresets format to the .xmp format, in addition they rebuilt your complete preset administration system.
For instance, if you happen to go to the preset folder in your laptop and attempt to transfer, rename or create new teams of presets, it received’t work; it is because Adobe needs us to handle presets from inside Lightroom—the identical means we handle our picture library.
Consequently, discovering a tutorial that gives the proper details about working with presets has been a substantial problem. It looks like it’s an not possible activity as a result of a lot of the articles on the subject are less than pace with the newest Lightroom adjustments.
We’ve determined to provide you an in-depth, up-to-date tutorial on find out how to arrange Lightroom presets in 2022
Tips on how to Manage Lightroom Presets
Lightroom presets are the very best factor ever. They prevent time, make your pictures look nice, and are straightforward to make use of. However when you have many, you understand that organizing them could be a ache within the neck.
Earlier than beginning something, guarantee your presets are backed up – this could all the time be precedence primary! After you’ve carried out that, you can begin organizing!
Listed here are among the finest methods in which you’ll handle your Lightroom presets:
1. Disable Lightroom Default Presets
There are a number of presets that include Lightroom. Some are helpful, however most of them aren’t. The extra Lightroom presets you’ve in sight, the extra cluttered your Develop Module will get. It’s higher to make sure that solely those you want are there.
Steps to disable Lightroom Default Presets:
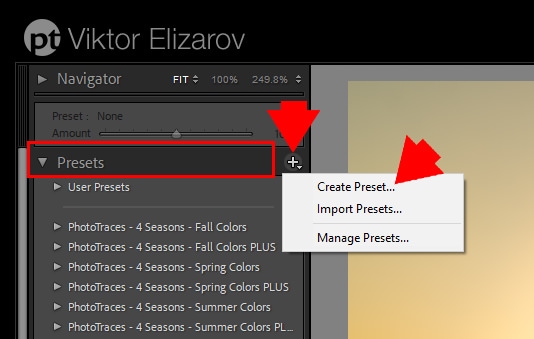
- Within the Develop Module, head to the “+” signal subsequent to the Preset panel
- Go to “Handle Presets” from the dropdown menu.
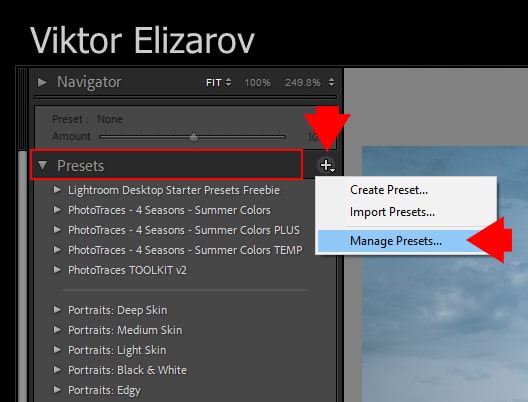
- Within the “Handle Presets” dialogue field, uncheck the presets you need to take away out of your Presets Panel (examine all of them to eliminate all)
- Click on “Save”
2. Take Benefit of New Favourite Assortment
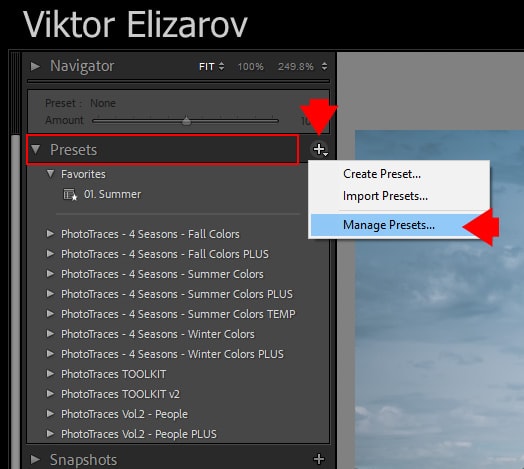
You may add any preset in your Lightroom library to your Favourite Assortment. This manner, you possibly can entry these presets shortly with out going by way of all of the presets in the principle panel – as a result of they are going to be proper on the high!
When engaged on a photograph, you possibly can shortly select out of your favourite preset assortment with out going by way of the ordeal of manually looking.

So as to add a preset to Favourite Assortment:
- Within the Develop Module, right-click on the preset you need to add
- Click on “Add to Favorites” from the dropdown menu

To take away a preset from Favourite Assortment:
- Within the Develop Module, right-click on the preset you need to take away
- Click on “Take away from Favorites” from the dropdown menu

4. Disable Assortment You Do Not Want
It’s nice to have completely different collections for various modifying wants. However you’re not going to make use of them unexpectedly.
An effective way to prepare your presets is to disable those you don’t use in the meanwhile. For instance, if you happen to’re processing panorama pictures, it could be useful to disable the presets that you simply’re utilizing for portraits or cityscapes. This manner, you possibly can guarantee they aren’t cluttering up your listing.
Steps to disable Assortment:
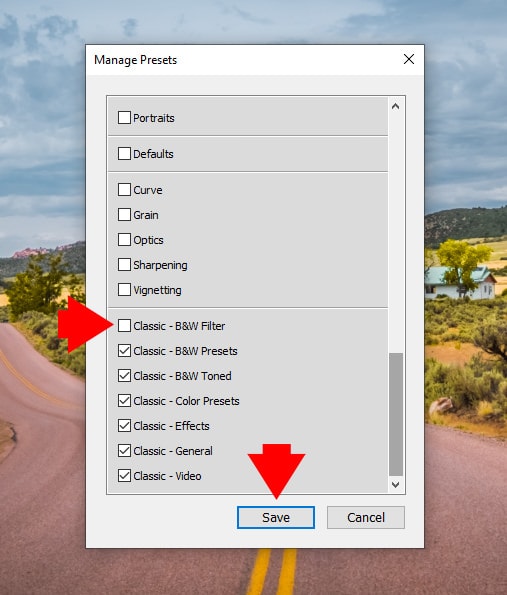
- Within the Develop Module, head to the “+” signal subsequent to the Preset panel
- Go to “Handle Presets” from the dropdown menu
- Within the “Handle Presets” dialogue field that pops up, uncheck the collections you need to conceal out of your Preset Panel.
- Click on “Save”

You’ll discover that the Assortment has disappeared from the Preset Panel. Don’t fear; you possibly can all the time allow it once more by going to the identical dialogue field and (re)checking the Assortment you need to add to the Preset Panel.
Please observe that disabling a bunch of preset collections won’t enhance Lightroom efficiency. Lightroom nonetheless hundreds all of them to reminiscence on startup. It solely hides them from the person.
5. Tips on how to Rename Preset in Lightroom
An vital change that wants mentioning is that you simply now need to rename presets from inside Lightroom. In the event you change the title exterior, Lightroom received’t find out about it and can hold utilizing the unique title.
If you wish to rename one thing in Lightroom, observe the following steps:
- Within the Develop Module, go to the Presets Panel and right-click on the preset you need to rename
- Click on “Rename” from the dropdown menu
- A “Rename Preset” dialog field will pop up. Right here you possibly can select a brand new title to your preset
- Click on “Okay”

6. Tips on how to Transfer Presets to New Assortment
You may transfer presets to a brand new assortment solely from inside Lightroom (similar to with renaming).
Earlier than, you would go to the preset folder and make any adjustments you needed there. Now, the adjustments you make exterior of Lightroom received’t be utilized contained in the software program.
Steps to maneuver presets to New Assortment:
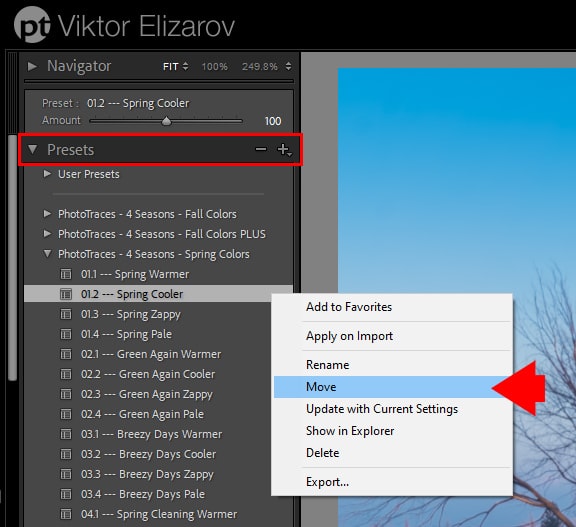
- Within the Develop Module, go to the Presets Panel and right-click on the preset you need to transfer
- Click on on “Transfer” from the dropdown menu

- A “Transfer Preset” dialog field will pop up. Within the Group menu, you possibly can select the brand new location to your preset or create a brand new assortment (by selecting “New Group”)
- Click on “Okay.”

Please observe which you can all the time transfer the presets by dragging them from contained in the Presets panel onto the gathering you need to embrace them in.
7. Tips on how to Create a Preset Folder in Lightroom
First, you’ll have to create not less than one preset to make a preset folder! So after you’ve made all of the changes you need on a photograph of your selection and saved your preset, you can begin creating the Preset Folder.
Steps for making a Preset Folder in Lightroom:
- Within the Develop Module, choose a photograph and apply all of the changes you need to it
- After you’re glad with the end result, go to the Preset Panel and click on on the “+” signal subsequent to it.
- Click on on “Create Preset” from the dropdown menu
- Within the “New Develop Preset” dialogue field, go to “Preset Identify” and write the title of your preset
- Within the “Group” part, choose the “New Group” choice from the dropdown menu
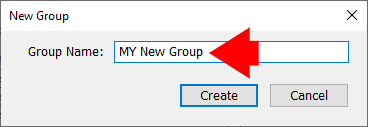
- A “New Group” dialog field will pop up. Right here, you possibly can choose the title of your new Preset Folder
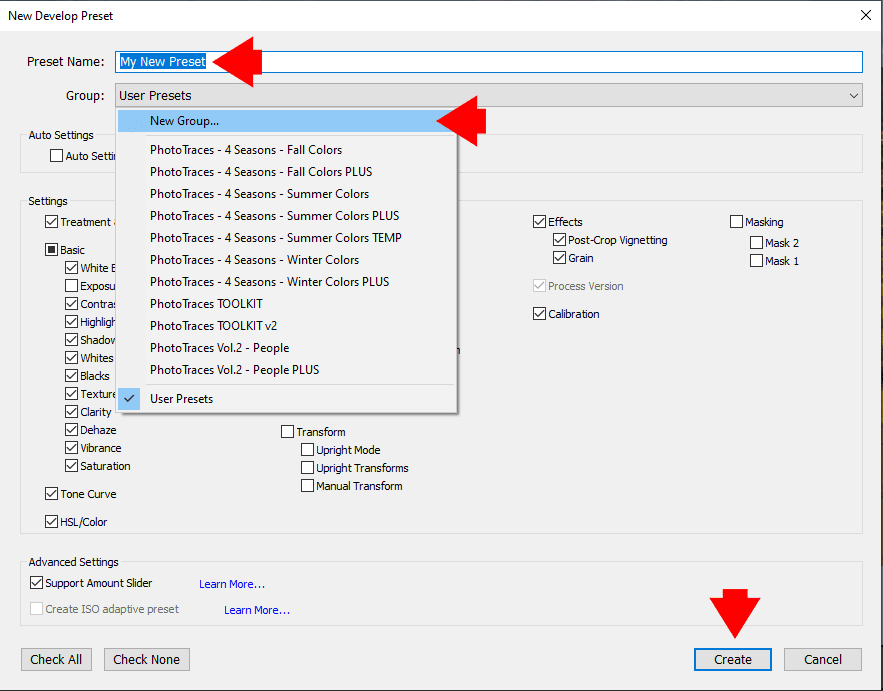
- After giving a second have a look at all of the changes within the “Settings” part, click on “Create.”
Alternate options:
If you have already got a preset and also you simply need to add it to a brand new Preset Folder, you possibly can MOVE or IMPORT it.
Transfer preset to a brand new Preset Folder:
- Within the Develop Module, go to your preset within the Preset Panel and right-click on it
- Click on “Transfer” from the dropdown menu.
- Within the “Transfer Preset” dialog field, choose “New Group” from the “Group” part dropdown menu
- Within the “New Group” dialog field, title your Preset Folder and click on “Create”
- Click on “OK”

Import preset to a Preset Folder (immediately):
- After making a Preset Folder, you possibly can right-click on it and choose “Import” from the dropdown menu.
- Choose the location of your preset and click on “Import”
Voila! You might have a brand new Preset Folder!
Tips on how to Manage Lightroom Presets | Ultimate Ideas
Typically, it’s straightforward to create or purchase too many presets; earlier than you understand it, you’ve grow to be a preset hoarder.
Studying find out how to arrange Lightroom presets could seem daunting at first, however it’s easy. Even if you happen to don’t grasp the method instantly, you will see it simpler when you begin doing it. Being diligent about organizing your presets ensures which you can shortly discover what you’re in search of, which is particularly useful whenever you don’t have a lot time to edit.
And when your modifying course of is simplified, you possibly can focus extra on bringing your artistic imaginative and prescient to life.