
The Lightroom Histogram Enhancing is a strong but usually lesser-known instrument inside Adobe Lightroom. Whereas many photographers are aware of the fundamental modifying options, the potential of the Lightroom histogram stays obscured to most.
On this article, I’ll make clear this performance and discover the way it serves as an efficient interactive modifying instrument, able to streamlining your picture post-processing in Lightroom.
What’s Histogram in Lightroom Basic?
In Lightroom, a histogram is a graphical illustration of the tonal distribution in a picture. It shows the distribution of pixels based mostly on their brightness values, from pure black (shadows) on the left aspect of the histogram to pure white (highlights) on the appropriate aspect. The horizontal axis of the histogram represents the vary of tonal values, whereas the vertical axis reveals the variety of pixels at every tonal worth.
What Lightroom Histogram Tells Us?
The Lightroom histogram graph gives important details about a picture’s publicity and tonal distribution, serving to you consider and modify the brightness, shadows, highlights, and general tonal stability. By analyzing the histogram, you can also make knowledgeable selections about your picture’s publicity and make crucial changes to realize your required look.
Some of the beneficial info that Lightroom Histogram gives is “clipping” info.
Clipped Highlights and Clipped Shadows Info
Histogram clipping in pictures happens when the information in a picture exceeds the dynamic vary capabilities of the digital camera sensor for correct recording or show. This challenge often arises at each extremes of the histogram, specifically within the highlights (proper aspect) and shadows (left aspect).
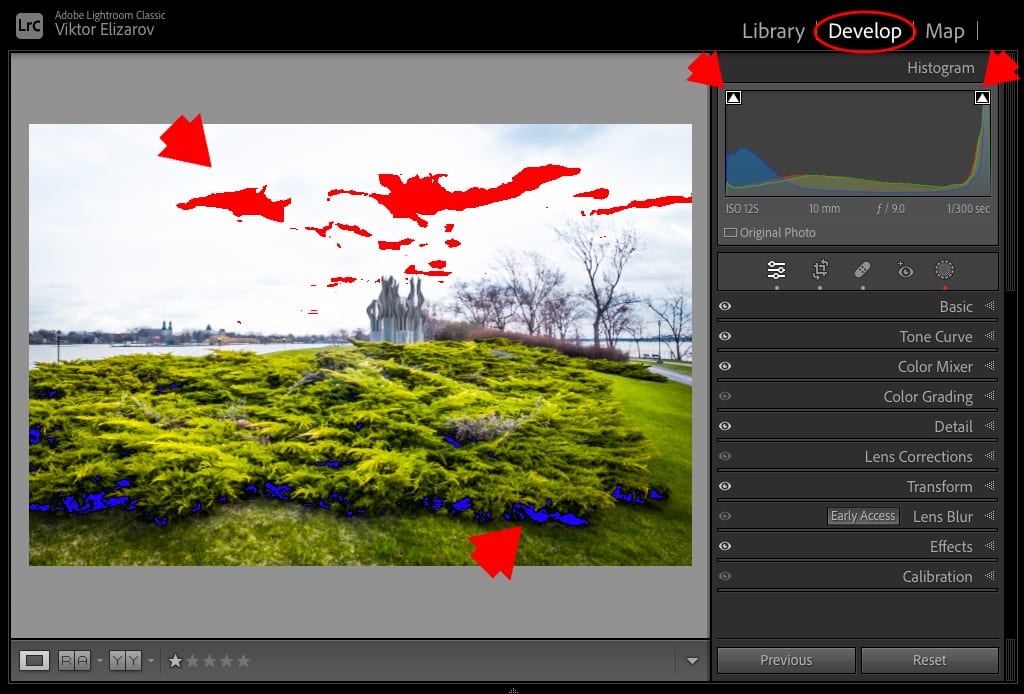
Lightroom’s histogram consists of clipping indicators ( you may toggle them on and off) that may reveal whether or not any areas inside your picture have misplaced element as a result of overexposure (highlights clipping) or underexposure (shadows clipping). When overexposed or underexposed areas are detected, they’re highlighted in purple (for overexposure) or blue (for underexposure) inside the histogram.
If you take a look at the histogram, you may see that each the highlights and the shadows are clipped.
Whereas most photographers use the Lightroom histogram for evaluation functions, many are unaware of its potential as a strong modifying instrument.
Enable me to exhibit how.
The way to Use the Lightroom Histogram as an Enhancing Instrument
No matter whether or not you utilize preset-based modifying or favor a freestyle workflow, anytime you dive into Lightroom’s principal modifying instruments on the appropriate panel, you at all times want to regulate the fundamentals. What I imply by fundamentals are publicity, shadows, and highlights. I might say that 99% of the time, I must tweak or modify these edits.
Sometimes, you’d entry the BASIC modifying panel in Lightroom and use the corresponding adjustment sliders.
See additionally: Histogram in Images & The way to Learn a Histogram
There’s additionally yet one more option to obtain the identical outcomes by benefiting from Lightroom Histogram interactivity.
Utilizing the Lightroom histogram as an interactive instrument to edit pictures is a enjoyable and beneficial approach that permits you to make changes by dragging particular areas of the histogram.
Step 1
Begin by importing your picture into Lightroom and getting into the Develop module the place you may entry modifying instruments.
Step 2
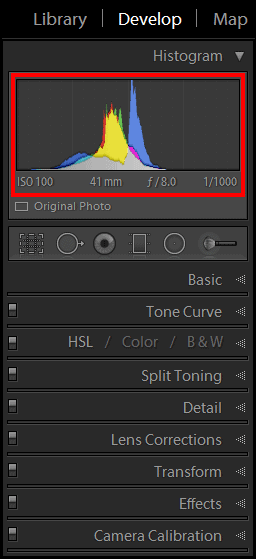
To entry the histogram in Lightroom, navigate to the Develop Module. You’ll discover the Histogram Panel on the prime proper nook of the interface. Click on on it to open the panel.
Step 3
The histogram is split into 5 areas, together with Blacks, Shadows, Publicity, Highlights, and Whites. These areas correspond to totally different tonal ranges in your picture.
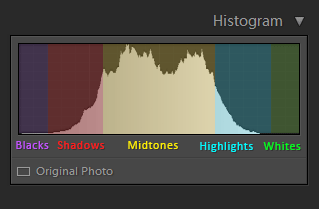
To start modifying, hover your mouse cursor over the world of the histogram that corresponds to the tonal vary you wish to modify. For example, if you wish to modify the publicity, place your cursor over the Publicity space.
Step 4
With the world chosen, drag it left or proper alongside the horizontal (x-axis) route. Shifting it to the left will lower the worth whereas transferring it to the appropriate will enhance it.
For instance, if I want to regulate the Publicity in my picture, I choose the largest space in the midst of the Histogram Panel and drag it to the left if I wish to lower the publicity or to the appropriate if I wish to enhance it.
Under the histogram, you’ll discover the chosen parameter’s identify on the left and its worth on the appropriate. This gives a numerical reference for the adjustment you’re making.
And listed below are the corresponding modifying sliders from Lightroom Primary Panel:
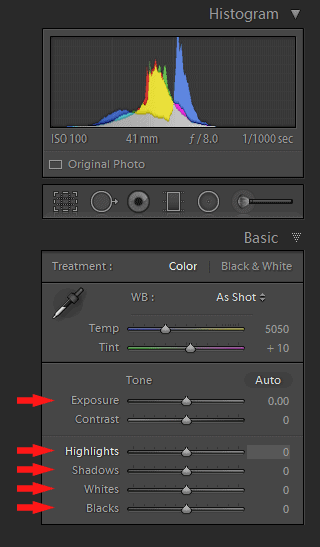
As you drag, you’ll instantly see the impression in your picture in the primary preview window. On the identical time, the worth of corresponding modifying sliders within the Primary Panel will change as properly.
This interactive course of permits you to fine-tune the picture’s publicity, shadows, highlights, or different tonal features.
Associated: Lightroom Workflow Suggestions
This visible and interactive instrument makes primary changes each a really fast and enjoyable course of.
Lightroom Histogram Enhancing Case Examine
In the present day, I’m going to exhibit use the Histogram Panel solely to edit the picture.
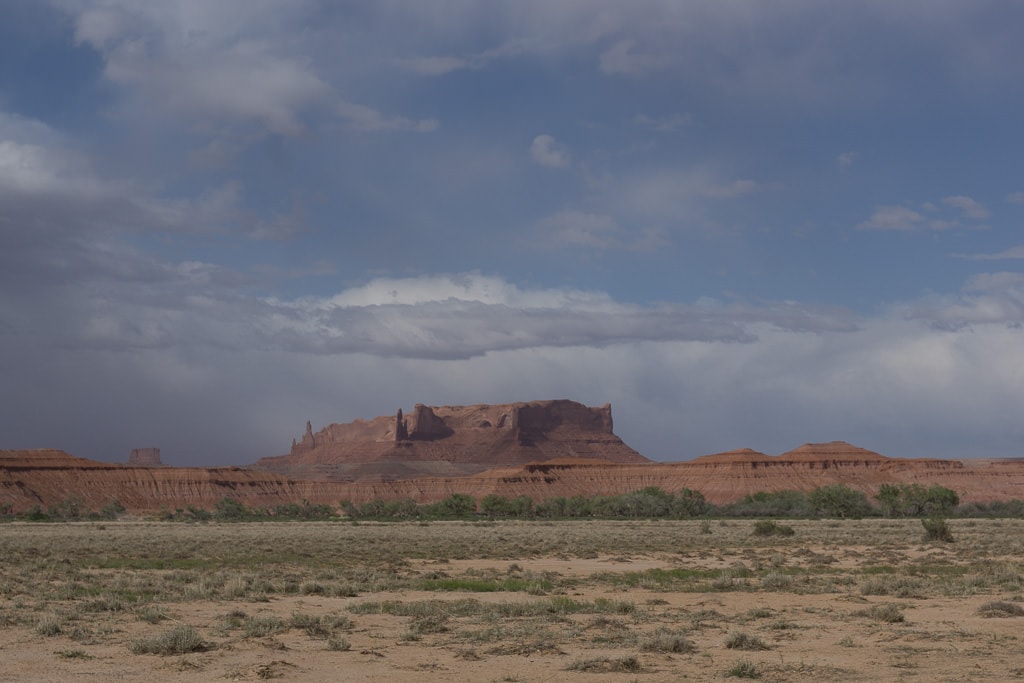
Right here is the unique, unprocessed RAW picture I took whereas driving from Arizona to Utah throughout my newest Southwest journey.
Step 1: Highlights and Shadows Restoration
Step one is to recuperate Highlights and Shadows.
I choose the Highlights space of the Lightroom Histogram panel and dragged all of it the best way to the left till I reaches worth of -100.
Subsequent, I choose the Shadows space and dragged all of it the best way to the appropriate. I set the utmost potential worth of +100.
The results of the restoration was considerably flat and unappealing.

Step 2: Distinction and Saturation Enhance
Subsequent, by boosting the Whites and Blacks I can enhance the distinction and saturation.
I set the worth of Whites to +55 and worth of Blacks to -69. As soon as once more, I can obtain it by deciding on applicable space and dragging the on x-axis.

As you may see, you may increase the distinction and saturation with out utilizing the devoted Saturation and Distinction sliders.
Step 3: Adjusting Publicity
The final step is to pick out Publicity space in the midst of Lightroom Histogram and drag it to the appropriate till the picture appears correctly uncovered.
The Publicity worth of +0.40 appears about proper.


Picture Transformation
Under you may see the Lightroom earlier than and after transformation. Please word, it took me solely 4 easy changes with out utilizing the primary modifying instruments.
Lightroom Histogram | Last Ideas
As you may see this method permits you to use Lightroom Histogram as a visible interactive modifying instrument. This strategy works properly with preset-based workflows when you must modify the Publicity earlier than or after making use of Lightroom Develop presets.