
When you’re seeking to perceive Lightroom tender proofing, then you definitely’ve come to the proper place.
On this article, I’m going to cowl the ins-and-outs of soppy proofing in Lightroom–in order that by the point you’ve completed, you’ll know:
- What tender proofing is
- The right way to work with the Lightroom tender proofing panel
- The right way to use tender proofing for gorgeous outcomes when printing
So should you’re prepared to find every part you have to find out about tender proofing, then let’s get began.
What Is Coloration Proofing in Digital Imaging?
Proofing is all about checking the accuracy and high quality of a bit–earlier than creating the ultimate consequence.
In digital imaging, colour proofing particularly entails checking the colours of a print earlier than you spend on printing.
Why is that this crucial?
Learn additionally: The right way to Transfer Lightroom to a New Laptop
As a result of totally different papers and printers give totally different appears to be like to your photographs–so, should you’re not cautious, you’ll find yourself with a print that doesn’t match your monitor and is now not as much as your requirements.
As an example, one printer and paper mixture could barely desaturate your print; one other may lower distinction, one other is perhaps unable to render darkish tones with out clipping, and so on.
See additionally: Matte vs Shiny Pictures
However as an alternative of simply hitting the Print button and hoping that every part seems okay, photographers depend on the proofing course of. This permits for a colour test previous to printing, say, a 20 x 30 canvas print in your wall.
Make sense?
Mushy Proofing vs Onerous Proofing
In digital imaging, there are two forms of proofs:
Mushy proofs and exhausting proofs.
The excellence is easy:
Onerous proofs are bodily. You may maintain them in your fingers, and use them to know the way your remaining copies will end up (if left unadjusted). As an example, should you plan on ordering 100 wall-sized prints from a printing firm, the corporate will give you just a few small exhausting proofs, which you should use to right errors.
Whereas tender proofs are digital; they’re meant to imitate the outcomes you’d get from a tough proof, however on a monitor. In images, they’re an important technique of figuring out how your print will end up, with out requiring the time or (generally) cash wanted to make a tough proof.
What’s Mushy Proofing in Lightroom?
Lightroom tender proofing is the tactic of just about reviewing how a print will look, prior to really printing. With Lightroom’s tender proofing possibility, you’ll be able to shortly detect any surprising variations in colour or tones, then make the required modifications to realize the print you envisioned.
What’s particularly spectacular about Lightroom’s soft-proofing panel is you’ll be able to simulate all kinds of paper and print combos; that means, you’ll be able to precisely soft-proof your prints for a variety of attainable conditions.
Learn additionally: High Lightroom Keyboard Shortcuts
Additionally helpful is the flexibility to see the proof side-by-side with the unique, so you can also make modifications on the spot.
Lightroom Mushy Proofing: A Step-By-Step Workflow
Mushy proofing in Lightroom is easy.
And on this part, I’m going to take you thru the soft-proofing steps, as a way to shortly tender proof photographs everytime you want.
1. Activate Mushy Proofing
First, you have to activate the Lightroom soft-proofing possibility.
To do that, merely faucet ‘S’ in your keyboard. Ensure you are within the Develop Module.
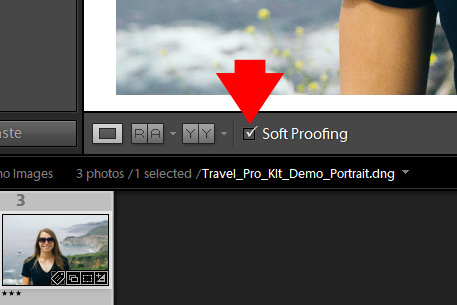
Alternatively, you’ll be able to test the Mushy Proofing checkbox on the backside of the picture:
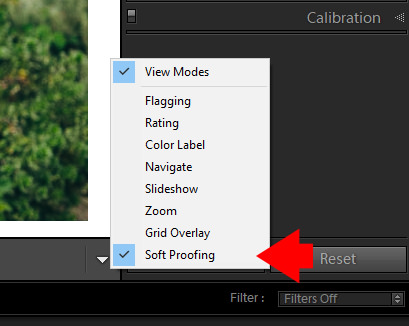
Be aware that should you don’t see the soft-proofing checkbox, it must be revealed. Click on the fly-out menu icon within the backside proper nook of the picture view, then faucet Mushy Proofing.
2. Create a Digital Copy
The subsequent step is to create a digital copy of your picture; to do that, merely click on on the Create Proof Copy button within the Mushy Proofing panel.
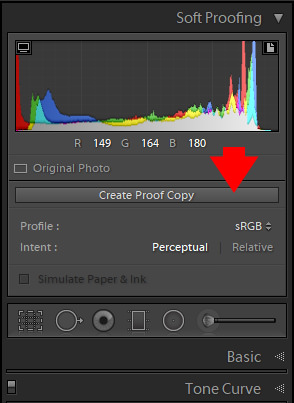
(A digital copy is a very similar model of your picture–one which’s saved individually within the Lightroom atmosphere, however doesn’t really get duplicated in your exhausting drive.)
3. Choose the Profile That Matches the Printer and Paper You Will Use
That is an especially essential step–and, if skipped, you’ll find yourself with an inaccurate proof.
As talked about above, totally different printers and paper create totally different outcomes, so that you should guarantee you choose the right printer/paper mixture earlier than shifting ahead with the proofing course of.
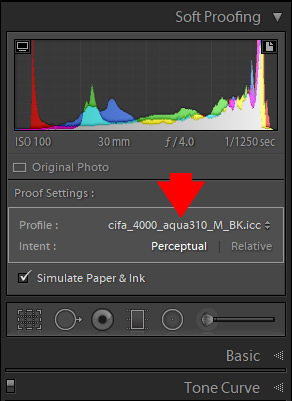
In my case, I’ve ICC Profile for Epson Stylus Professional 4000 printer and Aquarell Rag 310g/m2 Matte Black paper.
When you can’t discover your printer/paper mixture in Lightroom, look on-line; many firms embody downloadable profiles that you would be able to entry. Canson Infinity web site is an efficient place to start out.
4. Choose Your Intent
The intent tells Lightroom find out how to regulate your print in response to paint issues. It’s a posh subject, so I simply advocate you choose the Perceptual possibility; that is usually the higher approach to go.

If you wish to study extra in regards to the subject, test in-depth article right here.
5. Verify the Simulate Paper & Ink Checkbox
The Simulate Paper & Ink checkbox ensures that the tender proof mimics the impact of the paper and ink in your file.
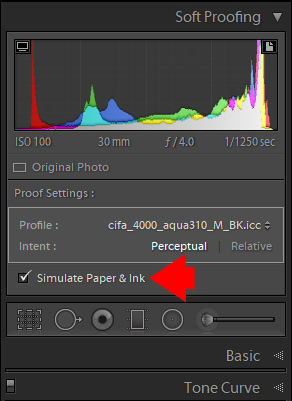
So be sure that it will get checked; in any other case, you’ll find yourself with an inaccurate proof.
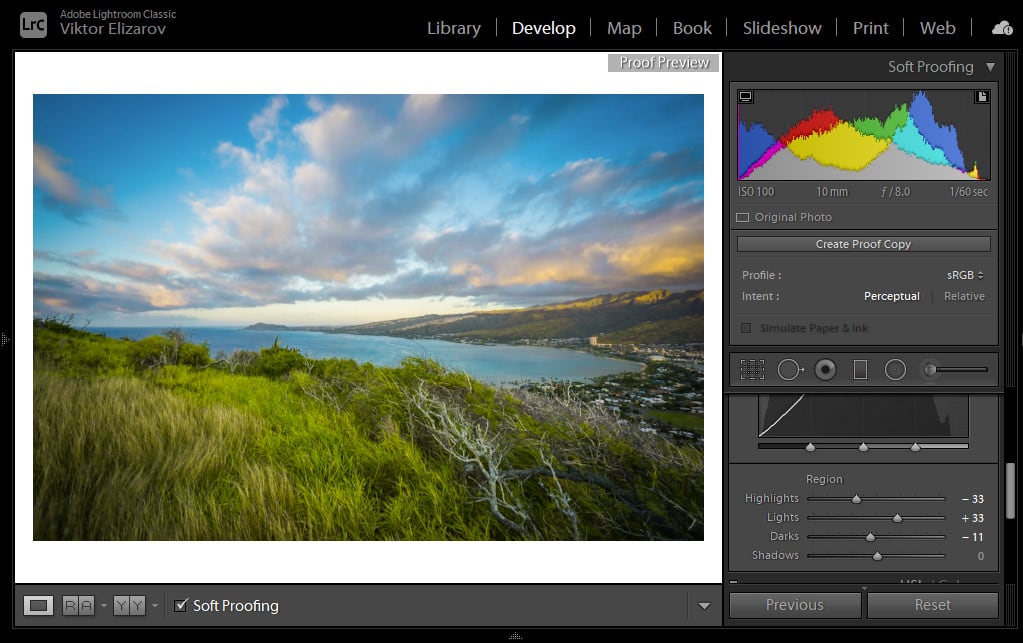
6. Enter the Earlier than & After Mode By Clicking the ‘YY’ Button
Subsequent to the soft-proofing button, you will discover the totally different view choices. This features a Earlier than/After view, which you’ll be able to activate by tapping the ‘YY’ button:

Be aware that it will will let you examine the tender proof to the “grasp” picture. While you make changes in the remainder of the Develop module panels, they’ll solely be mirrored in the proper (proof preview) window, and never within the left (grasp) window.
That is helpful for the subsequent step:
7. Modify the Digital Copy
Now it’s time to make your proof preview match the unique picture. When you’ve completed this step, then you definitely’ll have a file that may be printed with good outcomes.
See additionally: The right way to Soften Pores and skin in Lightroom
So fastidiously examine the ‘grasp’ picture to its ‘proof preview, then make changes to the proof till it appears to be like similar to the grasp picture.
8. Flip Off Mushy Proofing in Lightroom
And that’s it! You’re finished!
To exit the Mushy Proofing panel, merely faucet ‘S’ in your keyboard, or uncheck the Mushy Proofing checkbox.
Mushy Proofing for Digital Publishing
One very last thing:
Whereas tender proofing is primarily utilized by photographers seeking to print their photographs, you may also use it for an alternate function:
To make sure your photographs look nice when posting them on the web.
You see, photographers usually use Lightroom with a darkish grey background; this brings out the darker components of your photographs and makes them look brilliant compared.
Learn additionally: Finest Lightroom Export Settings
A consequence of that is that photographs usually look darkish when displayed on the net, the place the white background is predominant.
So, to forestall this challenge, shortly hit the Mushy Proofing shortcut (‘S’). Since soft-proofing at all times makes use of a white background, you’ll be able to shortly test how your picture will look on the web; if it appears to be like too darkish, be certain that to brighten it up barely earlier than exporting!
Lightroom Mushy Proofing: Conclusion
Now that you simply’ve completed this text, it’s best to know all about Lightroom tender proofing.
And also you’ll be capable to get the very best prints, proper from the get-go!
For extra Lightroom associated articles and tutorials test devoted Lightroom Tutorial Web page.