
I took the featured picture within the Capitol Reef Nationwide Park in Utah.
The Capitol Reef is the least visited nationwide park in Utah. It’s situated fairly far-off from main southwest cities and, because of this, attracts fewer vacationers.
The gap to Capitol Reef from Las Vegas is 550km, 800km from Phoenix, and 700km from Denver.
However, the park is filled with vacationers throughout the excessive season, from Could to October.
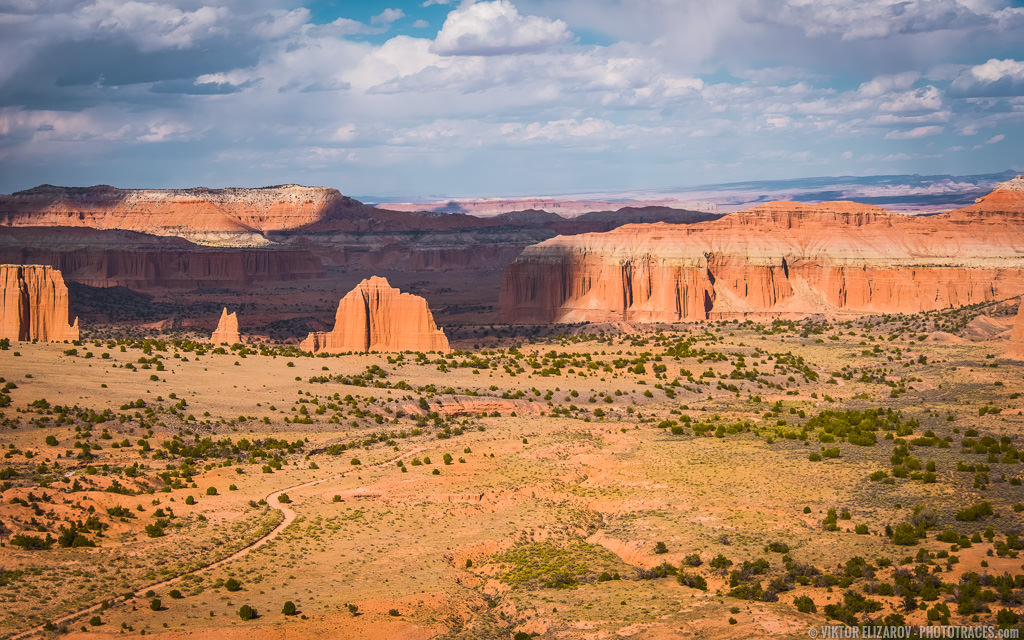
However for individuals, preferring secluded areas, like me, there’s at all times Cathedral Valley.
The valley is situated additional away from the main park’s sights, and the one approach to get there’s by driving 50km of ruff and twisted filth street. Plus, to get there, it is advisable to ford the Fermont river. It isn’t a giant deal within the dry season, however after heavy rain or flash flood, it may be a problem.
The Cathedral Vally street loop is 92km lengthy, and more often than not, you do not want a 4×4 automobile, however you completely want a high-clearance one. Additionally, you want Capitol Reef Map.
In the course of the Cathedral Vally loop, there’s a primitive (free) campground situated at 2200m above sea degree, and it gives unbelievable views on Cathedral Valley.
I took the featured picture 50m from our tenting spot.
Taking pictures
As we speak, I wish to share my new method to getting the optimum publicity for my pictures. I’ve been testing the brand new method since switching to Fujifilm cameras and lenses.
The brand new technique is predicated on the premise that to get most high quality from the digicam sensor (any model, any mannequin), it is advisable to maximize sensor saturation with mild. The thought is to not get proper publicity in-camera however fairly to seize as a lot mild as doable with out clipping the highlights. And also you tackle the ultimate publicity changes in Lightroom or some other RAW editor.
I first got here throughout this method whereas watching YouTube channel Theoria Apophasis by Ken Wheeler, aka Indignant Photographer. After studying some extra technical information, I used to be satisfied that it was the fitting method for my pictures. Over a 12 months, I carried out the brand new method into my workflow. Consequently, most of my newest pictures are overexposed by 1/3 or 1/2 stops.
Beneath is the histogram of the featured picture. It’s overexposed by 1/2 stops.

Within the case of the featured picture, the capturing was straight ahead. I had my digicam on the tripod, and the setting solar was behind me, illuminating the valley with the mushy mild. I had no drawback capturing the dynamic vary of the scene with one shot. Bracketing was not needed.
Enhancing & Processing
It was a single RAW processing workflow.
Lightroom (70%)
I stored the unique facet ratio (3 x 2) however I needed to crop the picture barely to make composition tighter and to align the main line of the street with the underside left nook.
Subsequent, I
The Lightroom Preset Enhancing Formulation: Napa (5, 10, 13, 16, 20, 32)
Photoshop (30%)
In Photoshop, all I needed to do was to spice up particulars and scale back digital noise. Plus, I needed to do some cleansing by utilizing the Spot Removing device.
Plugins: DeNoise AI (noise discount).
Complete Time: 15min
Earlier than & After Transformation
