
The rule of thirds is a robust compositional machine – and may usually be the distinction between a shocking photograph and a boring one.
However what truly is the rule of thirds? How does it work? And must you all the time apply it in your compositions?
On this article, I’m going to take you thru all the things you should find out about this compositional “rule.” I’ll clarify how one can apply it to various kinds of photographs for excellent outcomes. And I’ll embrace loads of suggestions, methods, and useful pointers.
By the point you’re performed, you’ll be creating stunning compositions like a professional!
Let’s get began.
What Is the Rule of Thirds in Pictures?
The rule of thirds is a elementary compositional guideline. It makes use of a three-by-three grid to place the essential components of your photograph, in order that most important compositional parts are positioned a 3rd of the way in which into the body.
Right here’s the rule of thirds grid:
Subsequently, to observe the rule of thirds, you usually want to put your horizon alongside one of many horizontal gridlines. And also you usually want to put your most important topic(s) on the intersection of horizontal and vertical gridlines (often known as energy factors).
It’s how one can obtain a balanced picture similar to this one:
With the horizon falling alongside a horizontal gridline, and the primary space of curiosity completely focused by an influence level.
What Is the Origin of the Rule of Thirds?
Whereas the rule of thirds has been utilized by artists going again not less than to the Rennaissance, it was explicitly formulated by a painter, John Thomas Smith, within the late 18th century.
You see, artists realized that an excessive amount of symmetry in a chunk of artwork led to it changing into “awkwardly suspended” – in order that there was no actual circulation within the composition.
The rule of thirds, alternatively, advises artists to place their compositional parts with noticeably completely different proportions inside the scene. So as an alternative of portray (or, in our case, photographing) a panorama with half sea and half sky, you set the ocean within the backside third or backside two thirds of the body, you set the sky within the prime two thirds or prime third of the body, and you bought a dynamic, energetic composition!
When the rule of thirds is fastidiously utilized, the viewer observes the piece of artwork and their eye begins to wander, lingering on completely different parts of the composition – which is usually best. Plus, the rule of thirds helps preserve steadiness in a body, by offsetting a most important topic in a single third of the composition with a much less eye-catching space within the remaining two thirds of the composition.
It’s essential to notice, then, that the rule of thirds is not simply designed for images. Artists of all stripes use it, from painters to cinematographers and extra.
Why Does the Rule of Thirds Work?
The rule of thirds helps your compositions obtain two issues:
Steadiness.
And circulation.
Every of this stuff on their very own might not make for a shocking shot – however taken collectively, it’s the recipe for a really nice end result.
Particularly, the rule of thirds balances your composition by offsetting “heavy” parts in a single third of the body by “mild” parts in two thirds of the body.
Like this:
Do you see how the decrease portion of the photograph stands out – however is fastidiously balanced by the higher, emptier portion of the photograph?
That’s the rule of thirds at work.
As for circulation:
By dividing your composition into otherwise sized sections, the rule of thirds helps information the attention from component to component, somewhat than pushing it towards the middle of the body and conserving it there.
That means, the viewer doesn’t get caught in a single place. As an alternative, they go on a journey all through the picture.
How Can You Use the Rule of Thirds in Portrait Pictures?
Portrait images is a good place to start out with the rule of thirds.
Why?
Since you’ll usually have a transparent focal point (an individual!), plus a uniform background.
You see, when making use of the rule of thirds, I extremely suggest you begin by recognizing the primary topic of your composition.
Then place that most important topic alongside a gridline – and ideally at an intersection level.
In portrait images, this implies placing your portrait topic alongside a vertical gridline.
And I extremely suggest aligning the topic’s head with an higher rule of thirds intersection level.
In reality, if potential, you’ll need to place the topic’s eye exactly underneath the purpose of intersection, like this:
I’d additionally suggest you keep in mind a corollary to the rule of thirds, also known as the rule of area.
Rule of Area
The rule of area states that your topic ought to have room to look into.
So in case your topic is going through barely left, be sure they’re on the leftmost gridline, with loads of area on the left facet.
And in case your topic is going through barely proper, be sure they’re on the rightmost gridline, with loads of area on the precise facet.
Following the rule of area will hold your compositions fluid and relaxed (whereas violating the rule of area will usually create tense, uncomfortable outcomes).
Tips on how to Use the Rule of Thirds in Panorama Pictures
In panorama images, the rule of thirds usually depends closely in your positioning of the horizon line.
In any case, most panorama photographs have a transparent horizon.
And by fastidiously positioning this alongside the higher or decrease horizontal gridline, you’ll be able to create a shot that feels each balanced and dynamic, like this:
Be aware that, earlier than making use of the rule of thirds, you’ll need to take into consideration the kind of scene you’re working with.
When the sky is dramatic and daring, you’ll usually need to emphasize it by placing the horizon line on the underside horizontal gridline.
However when the sky is boring however the foreground gives plenty of curiosity, you’ll need to do the reverse:
Right here the focus is the river within the foreground and so the horizon is positioned near the higher horizontal line.

Place the foreground within the backside two-thirds of the body, with the horizon line sitting on the higher horizontal gridline.
To be clear:
The rule of thirds in panorama images doesn’t finish with the horizon line. You’ll usually need to fastidiously place eye-catching parts (similar to waterfalls or attention-grabbing rock formations) alongside the vertical gridlines, and ideally at intersection factors.
However putting the horizon line is usually the very first thing you’ll need to do – and it’s a good way to get the compositional ball rolling!
Rule of Thirds Pictures Suggestions
Now that you just perceive the rule of thirds and use it, let’s take a fast have a look at a number of useful suggestions for making use of it in your compositions:
Use the Rule of Thirds Digicam’s Grid Overlay
Almost each digital camera gives a rule of thirds grid overlay: a three-by-three grid that can be utilized overtop your photos.
(If the grid overlay isn’t displaying in your digital camera, I like to recommend exploring the menu; it’s nearly definitely there!)
And the rule of thirds overlay is tremendous useful.
First, for those who’re solely simply studying concerning the rule of thirds, the overlay will hold the idea contemporary in your thoughts, and offer you a fast solution to align your composition with the correct gridline positions.

However the overlay stays helpful, even as soon as the rule itself is ingrained in your thoughts. The overlay can usually act as a delicate reminder to place your topic barely to the left or proper, up or down – and it additionally simply helps you visualize the exact dimensions of the rule of thirds.
So be sure it’s switched on!
Use Visible Helpers When Modifying Photographs
Just about each standard modifying suite – together with each Adobe Lightroom and Skylum’s Luminar – provide some kind of rule of thirds crop overlay.
So even for those who fail to observe the rule of thirds once you’re out capturing…
…you’ll be able to repair it fairly simply throughout post-processing!
It’s essential to notice:
It is best to all the time attempt your finest to get the composition proper in-camera.
However issues occur, particularly for those who’re a newbie. You may neglect to use the rule of thirds. Otherwise you may by accident place your compositional parts barely out of alignment with the rule of thirds.
And that’s when cropping to realize the rule of thirds is a good suggestion.
Right here’s the way it works:

First, open your photograph in a post-processing program similar to Lightroom.
Entry the Crop software.
In Lightroom and Luminar, you need to routinely see a rule of thirds overlay.
If the Rule of Thirds overlay just isn’t lively by default, begin urgent the “O” shortcut to activate it.
Then use this overlay to information your self whereas cropping!
Simple, proper?
Breaking the Rule of Thirds in Pictures
The rule of thirds is a good compositional guideline.
However regardless of the title, it’s not a rule.
There are occasions once you’ll need to break the rule of thirds for an much more impactful picture.
As an illustration, in case your topic is small within the body, you may place them beneath or above a horizontal gridline for a minimalistic impact.
And in case your topic gives attention-grabbing symmetry, you may place them smack-dab within the middle of the body for a really intense shot.
Like this:

So whereas it pays to know the rule of thirds – and to all the time have it behind your thoughts – you also needs to experiment with different compositions for distinctive results.
Examples of the Rule of Thirds
Now let’s take a fast have a look at some rule of thirds examples.
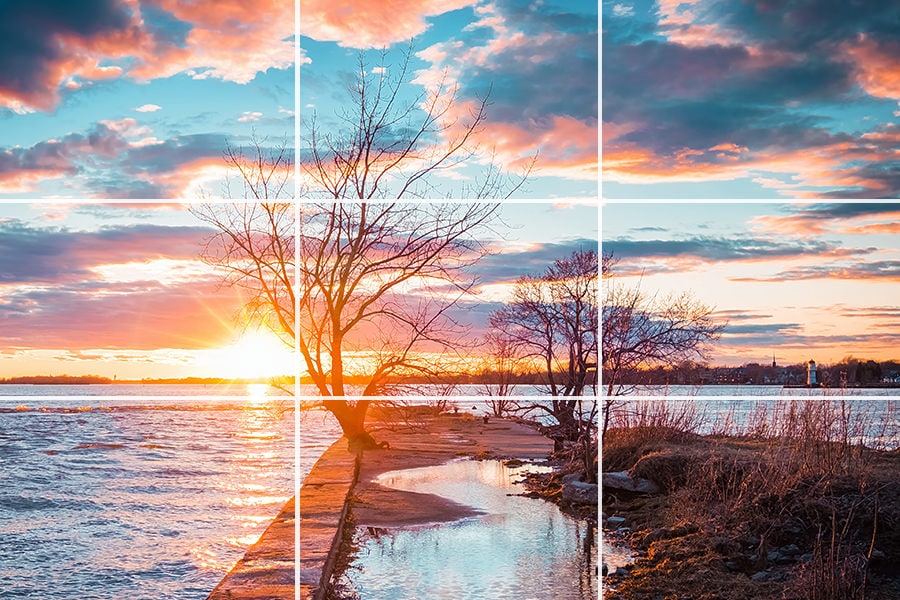
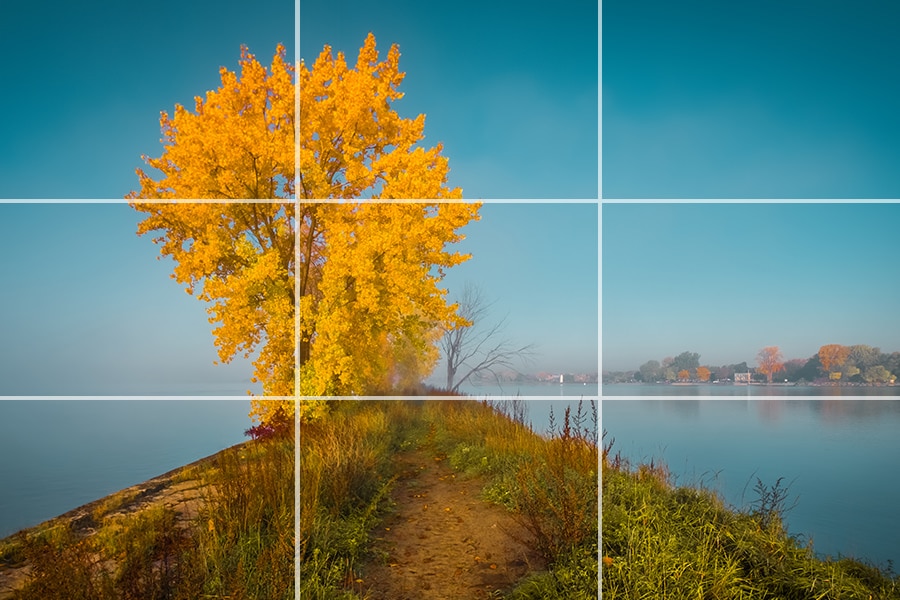
First, we’ve a pleasant panorama shot with a dramatic sky:

Discover how the horizon follows the decrease gridline; this serves to emphasise the sky and deemphasize the foreground.
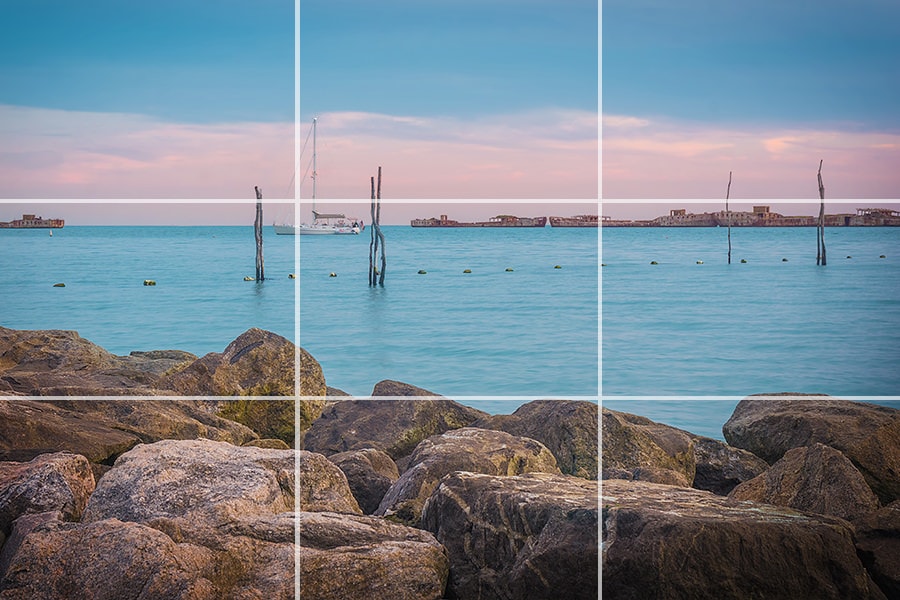
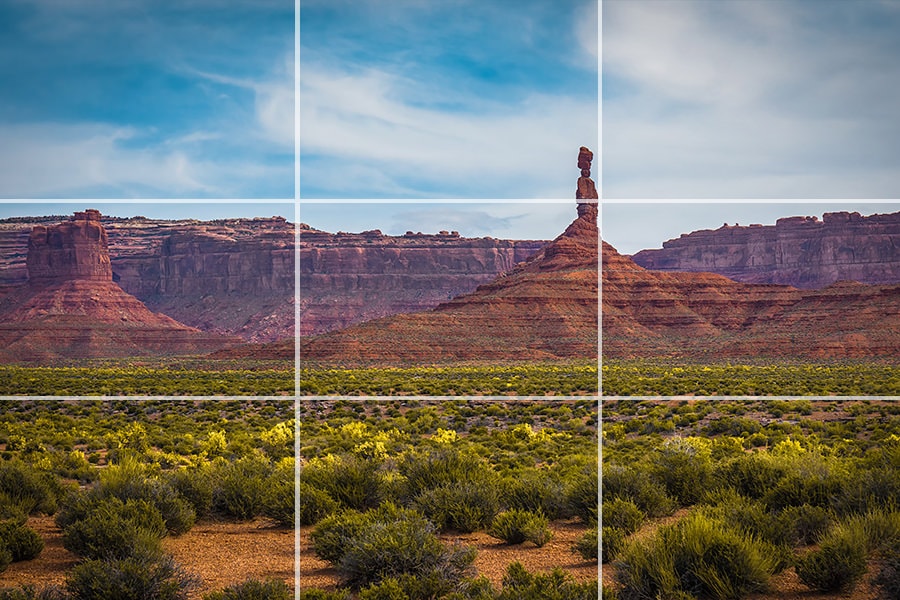
And right here is the other. The colourful foreground sample is given larger visible significance.

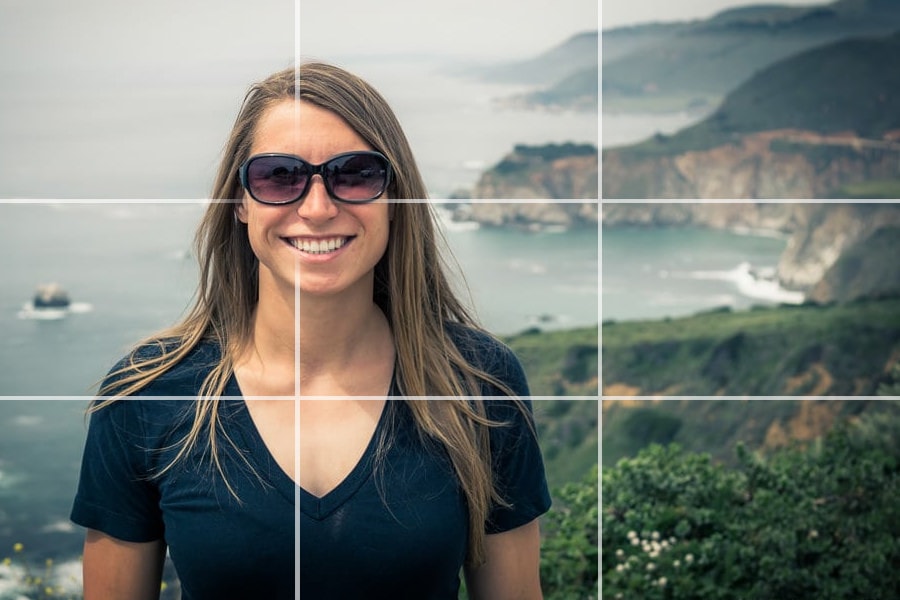
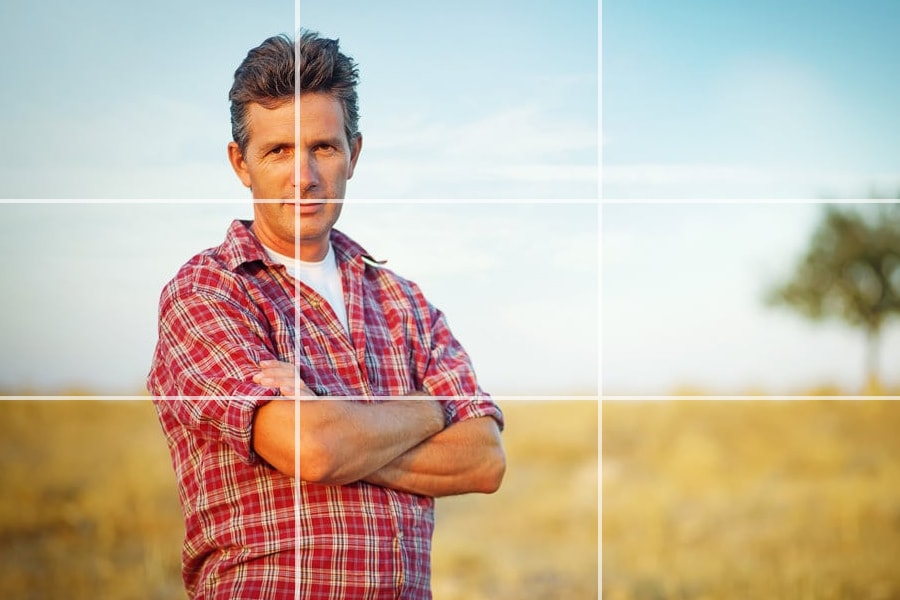
Then we’ve a portrait shot, the place the topic is positioned alongside a vertical gridline and the eyes sit near the rule of thirds energy factors:
In the event you’re studying concerning the rule of thirds for the primary time, I extremely suggest you head over to your favourite photographer’s web site. Then flick through their gallery, noting the place the rule of thirds is utilized, and noting how they utilized it.
As a result of studying by instance could be very highly effective – and it’s a good way to get accustomed to the rule of thirds, quick.
Conclusion
The rule of thirds may sound sophisticated, however – as you now know – it’s actually not!
Simply keep in mind to show in your rule of thirds overlay grids when capturing photographs and when modifying.
And don’t neglect to determine your most important topic earlier than composing.
Fairly quickly, you’ll be capturing gorgeous photos like a professional!