
If you wish to be taught the way to add watermark in Lightroom to guard your pictures, you’ll want to observe this tutorial.
Within the final article, I addressed the difficulty of utilizing Copyright Presets to embed copyright data into each {photograph} we take. I just like the metadata method for picture safety as a result of it isn’t intrusive, nor does it have an effect on the aesthetics of our pictures, and, relying in your wants, you may embrace loads of data. The draw back of utilizing metadata copyright data is that many on-line platforms don’t respect it.
Fb is the worst offender with regard to consumer pictures. Once you add a picture to Fb or submit it to Instagram, it strips all of the metadata out of your photograph. On high of that, it recompresses the picture with extraordinarily aggressive settings. I despise Fb for that however take into account it a essential evil since I’ve to make use of it to advertise my enterprise.
Google Plus was the friendliest for photographers as a result of it compressed pictures utilizing a really sensible algorithm that preserved all of the metadata included in every photograph. The dangerous information is that Google Plus is lifeless whereas the largest offender thrives. That is completely unfair however, it’s what it’s, and we should cope with it.
Associated: Lightroom Import Presets: Optimizing the Workflow
What this implies is that utilizing metadata copyright presets shouldn’t be sufficient when posting our pictures to social media.
Causes for Utilizing Watermarks
The second answer for safeguarding our pictures is watermarking.
Usually, I’m not a giant fan of watermarks. I consider that 99% of photographers misuse watermarks. My largest grievance is that almost all of watermarks on the internet smash the creative facet of the {photograph}. They’re too intrusive. After I come throughout such {a photograph}, all I can see is the ugly watermark and I can not benefit from the precise photograph.
In my images, I attempt to preserve a stability between defending the picture and the aesthetics.
As soon as once more and just like how I take advantage of copyright metadata, I don’t use watermarks solely for picture safety. I strongly consider that if an individual desires to steal my photograph, there may be nothing I can do. The metadata may be stripped, the watermark may be cropped or masked.
I add watermarks principally for discovery purchases. If somebody desires to purchase my photograph or just be taught extra about me as a photographer, the watermark supplies that chance. If somebody steals my pictures, which doesn’t occur usually, I deal with it as a price of doing enterprise and take a look at to not fear about it an excessive amount of.
Right this moment, I need to present you how one can add watermarks to your pictures and the way I method watermarks in my images.
Easy methods to Add Watermark in Lightroom
Since Lightroom makes use of non-destructive RAW modifying, it isn’t attainable so as to add a watermark to current RAW information. There isn’t any approach so as to add watermarks in Lightroom within the Library or Develop modules.
The one approach so as to add watermarks in Lightroom is through the export course of:
- If you end up able to export a photograph or a bunch of pictures from Lightroom, proper (choice) click on on the chosen photograph(s), and select Export from the menu. You may be introduced with the Export dialog field.
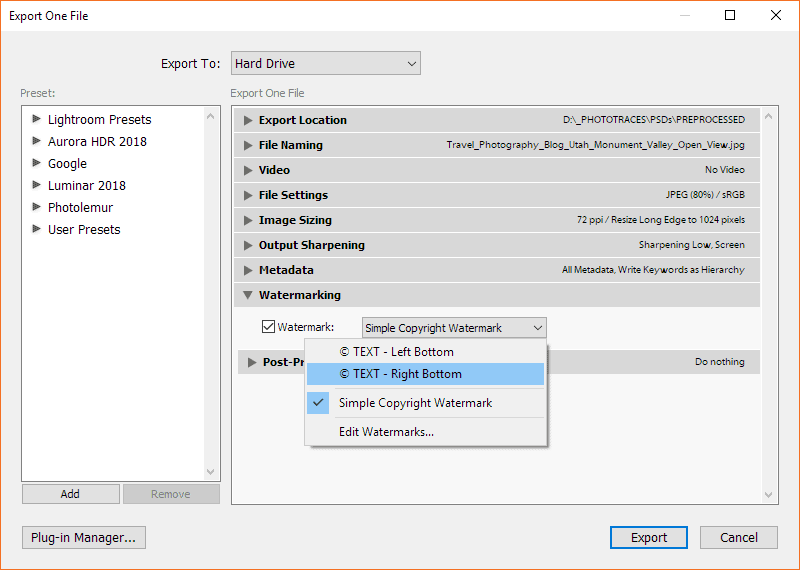
- Within the second to final export tab, you will see the Watermarking choices.
- When you choose the Watermark checkbox, the default worth is chosen—Easy Copyright Watermark.
- You’ll be able to hit the Export button and your photograph might be exported with a watermark.
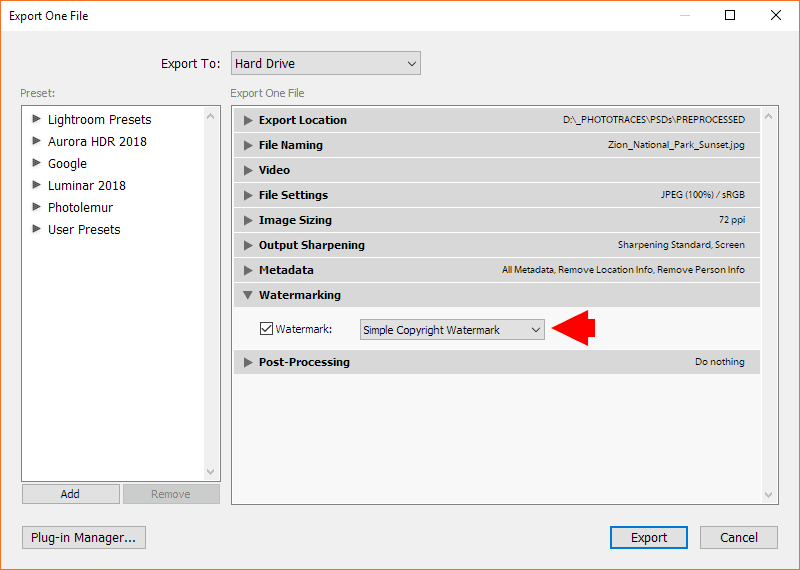
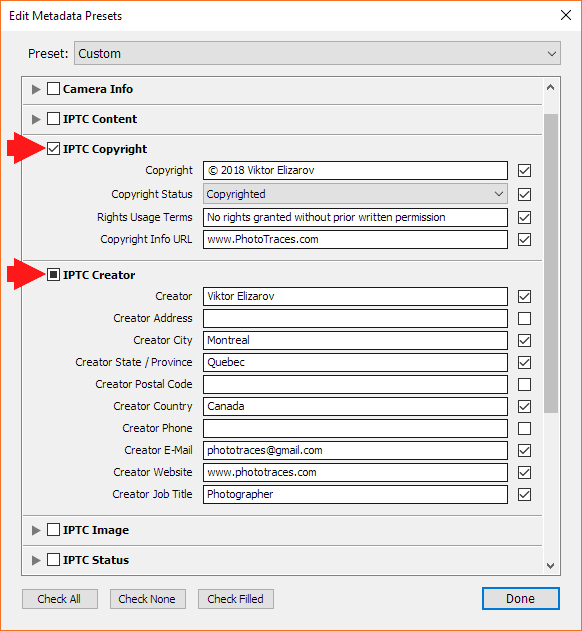
What the Easy Copyright Watermark in Lightroom choice does is take the knowledge from the IPTC Copyright > Copyright area of metadata (see the earlier problem) and apply it to the underside left nook of your photograph utilizing the default fashion (semitransparent white textual content).
It by no means seems to be good, however it’s a fast approach so as to add a watermark in Lightroom to your picture.

Easy methods to Create Customized Watermark in Lightroom Traditional
In case you are not pleased with the default watermark, you may create your personal utilizing a Watermark Template.
From the Watermark drop-down menu, choose the Edit Watermarks… choice.

You may be introduced with the Watermark Editor.
The primary choice within the Watermark Editor is what sort of watermark you need—Textual content or Graphic. In my case, I all the time use the Textual content choice. However, you may all the time choose the Graphic model and use a PNG picture with a clear background as a watermark.
I’ve by no means felt the necessity for a graphic choice.
As you may see, the Watermark Editor offers us loads of settings to customise the watermarks, which may be overwhelming at first.
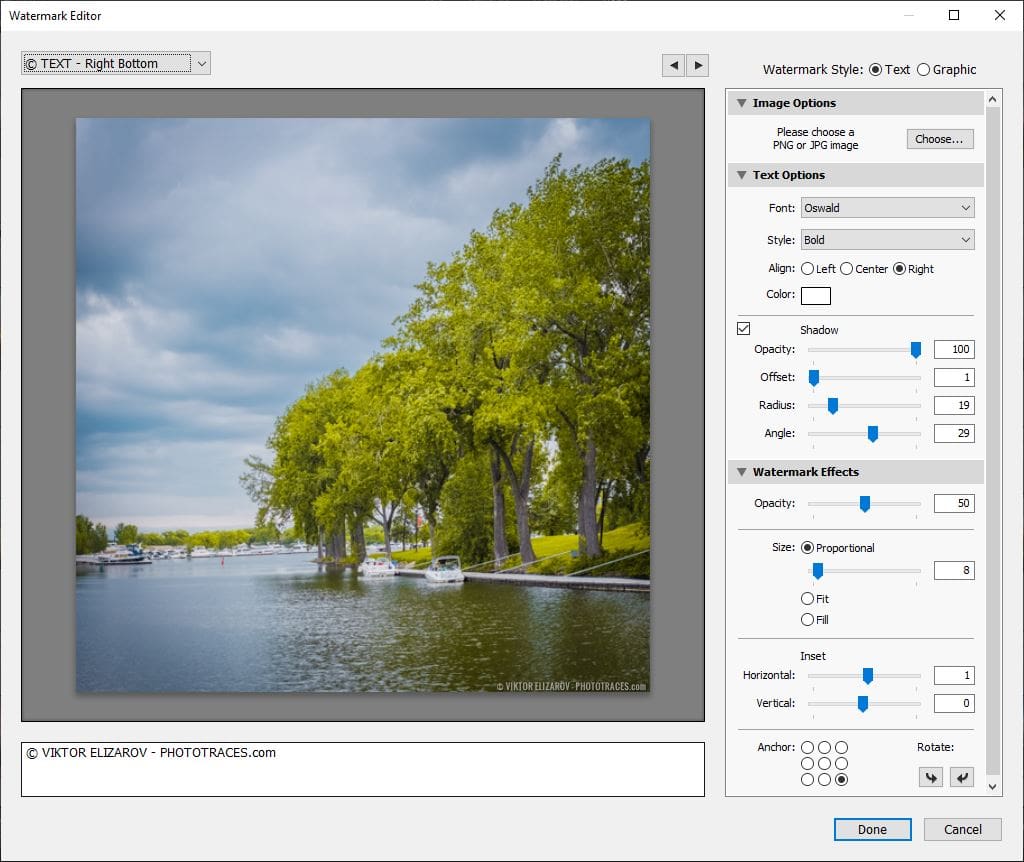
I counsel beginning with the settings I take advantage of in my template and, later, you may customise it to your liking.
If you end up pleased with the watermark design, it can save you all of the settings as a customized Watermark Preset.
In my case, I’ve two Watermark Presets—one for the underside left nook and one other for the underside proper nook of the picture. When I’m prepared so as to add a watermark to the photograph, I can all the time choose between the 2. My choice relies on visibility and intrusiveness. I need to ensure the watermark is readable however not too intrusive.


Easy methods to Add Customized Watermark in Lightroom on Export
To use a customized watermark to a photograph, you will need to choose a beforehand saved Watermark Template within the Export dialog.
Once you shouldn’t have customized watermark presets, the one choice you might have obtainable for you is the Easy Copyright Watermark. However after creating your personal customized watermark presets, the newly created presets might be obtainable for you within the Watermark drop-down menu.
Easy methods to Add Watermark in Lightroom: FAQ
How Do I Create a Brand Watermark in Lightroom?
To have the ability to use your emblem as a watermark, you’ll want to create a Customized Graphic Watermark Preset first.
Within the Watermark Editor, you’ll want to choose the Graphic choice as an alternative of Textual content.
The subsequent step is to pick out the graphic you need to use as a watermark.
The graphic cannot be created in Lightroom; you have to a picture editor like Photoshop.
The brand graphic must be with a clear background. Don’t use JPEG format in your emblem as a result of it doesn’t help transparency; use PNG format as an alternative.
Within the Watermark Editor, you may modify the positioning of the brand graphic, scaling, and transparency.
If you end up pleased with the look, reserve it as Customized Preset.
How Do I Watermark A number of Images in Lightroom?
To use a watermark to a number of pictures in Lightroom shouldn’t be very completely different from exporting a number of pictures.
- You choose a sequence of pictures in Library or Modifying modules.
- Proper (choice) click on on any of the chosen pictures and select the EDIT choice. The Export module might be activated.
- Find the Watermarking Tab and open it.
- Click on on the WATERMARK checkbox.
- From the drop-down menu, choose the watermark you need to apply.
- Hit the EXPORT button, and all of your chosen pictures might be exported with the watermark.
Can I Add Watermark With Adobe Digicam RAW?
The brief reply shouldn’t be.
Though the Adobe Digicam RAW (ACR) Photoshop plugin is an virtually equivalent utility to Lightroom’s Edit Module, it lacks the watermark performance.
It’s worthwhile to depend on Photoshop as an alternative. You’ll be able to create Photoshop Actions for batch watermarking to hurry up the workflow.
Easy methods to Add Watermark in Lightroom | Conclusion
To summarize my workflow, with the intention to maximize the invention and copyright safety of my pictures, I add Copyright Metadata to all my pictures and apply Watermarks to selective pictures I submit on social media.